|
|
|
1274 |
 |
 |
|
 |
| |
|
| |
|
10 Boring Photography Cliches to avoid
|
|
|
Today we will discuss about some photographic practices that are captured a thousand times by novices but has nothing new to appreciate the effort. They are easy to replicate shots and are tempting for beginners to copy. However, one should refrain from using these practices to showcase on professional photographic platforms. Here are some that you should absolutely avoid…
EXAMPLE: See the image here at flic.kr/p/F6s9c1
1: AVOID SELECTIVE COLORING: Either retain the photograph in color or convert the whole image to black and white. Have you seen any famous photograph or a prize winning shot that has used selective coloring often? In some cases, it’s ok to use this process creatively, but it does not mean this technique looks good always or in all frames. Use it judiciously and not frivolously.
2: AVOID WRITING ON TOP OF YOUR PHOTOGRAPH: Many photographers write the image caption on the image or their own watermark in big bold letters across the image. It not just destroys the overall image, but also is counter - intuitive as essential elements you want to show in the image gets hidden behind these words. Use your watermark artistically in a way that it does not obscure any essential part of the image. Better still, avoid writing altogether on your image and let people enjoy the beauty of what you capture.
3: BLACK AND WHITE IMAGES ARE NOT NECESSARILY CLASSIC IMAGES: In olden days, one did not have the facility of producing color images or rather color photography was not widely available. That’s why, most of the images we see from that era are in black and white. But that does not mean that black and white images are always classic images. All frames are not meant to be in black and white. So avoid converting all images in black and white and assuming that as soon as they become black and white, they turn into classic images. Convert to black and white if you want to showcase the texture, play of light or emotion etc. where color has no importance. Remember, our world is full of colors, so show them well too.
4: TRY MAKING CREATIVE SELFIES: A direct selfie is not considered as a creative photograph at all. We can see many beginners Facebook profile picture is a photograph taken in front of the mirror holding a DSLR. It does not look professional at all and looks rather tacky. Instead, try to capture self-portraits in different creative ways.
EXAMPLE: See the image here at flic.kr/p/FAMr1f
5. DO NOT USE HDR EXCESSIVELY: The HDR effect looks good because it shows the details in both highlight and lowlight areas. But using HDR excessively makes your image look unnatural and ugly. Use this effect modestly as all frames are not suitable for HDR. Excessive use of HDR makes it difficult to get the image published or to win a prize. If you want to apply the HDR effect, choose the frame wisely and the amount of HDR effect modestly.
6. AVOID A TILTING SHOT: Frame your shots either vertically or horizontally. A tilted shot does not follow any composition grammar and looks unappealing.
7. AVOID VIGNETTES: Vignette is also known as light fall off. It occurs due to the construction of the lens. We can also add this effect during post processing. Since the four corners of the image are darker than the rest of the image, it draws a viewer’s attention to the center of the image. While it is a nice effect to have and is very common thing in Photography, it is not widely accepted as an artistic effect.
8. DO NOT CELEBRATE POVERTY WITH YOUR IMAGE: Poverty is a social bane. If you want to capture the poor or a state of poverty, capture it with grace and dignity. Do not capture a frame that demeans and dehumanizes the poor.
9. AVOID COMMON SUBJECTS: There are some common subjects that are beautiful and beginners are usually drawn towards shooting them. For example the sunset and sunrise, beautiful flowers, clouds, rainbow, green grass, rail tracks, empty beaches, babies and kids, graveyards, lonely postboxes and colorful doors, beautiful artifacts, photography equipment like tripod, lens cap, etc. But these subjects have been excessively used by beginners as a straight shot. Use these subjects in your frame creatively instead. For example, a kid peeping out of a colorful door or a dramatic boat or activity on the beach.
10. DO NOT SHOWCASE UNEDITED PICS: For example, if you invite us at your home for dinner, will you serve uncooked or raw food? I guess not. So if you serve me cooked food, why would you serve up an unedited image! All images taken in a DSLR need some editing. So avoid posting unedited images and bragging about it. Just as you will not feel proud to serve raw food to your guests, so too it’s not a matter of pride to showcase unedited images.
There are other cliched ideas as well like light painting your name, adding unnecessary borders around the frame, bokeh, etc. These cliches are sometimes popular in wedding albums. However, in hardcore photography, these cliches are annoying and are not accepted at all. Try innovative approaches and unique angles if you want to create a name for yourself in the field of photography. Repeatedly making images with these cliched approaches are great to practice photography skills, but is not wise to share them as professionally clicked images on photographic platforms. So pick up your camera and shoot an image that is creative, artistic and unique. |
|
 |
 |
 |
 |
|
|
|
|

1272 |
|
|
|
|
| |
|
| |
|
Image Management - Part III
|
|
|
In Part-I, we learnt all about how to make two files for each of our images & we learnt how to rename the images in Part-II. Today we will discuss how to save the documents related to the image & how to create a back-up.
EXAMPLE: Check the image here at flic.kr/p/F7uB3K
I keep my Image File name according to the “Year of shooting-Number”. For this image it is Fourteen-15 where fourteen is the year (2014) & this image is number 15 from that year. I keep a OneNote for each year & have created a tab in that OneNote for each of that year’s image.
DOCUMENTAION
This is another very important aspect of image management. For example, you may want to participate in a contest this year but you don’t remember which image you sent last year making it hard for you to decide which image you will send this year as your entry. Another situation you may face is that some contests do not include an image which has already published somewhere and some other contests do not accept those images which have already won a prize. Now you will have lots of images in your repository, some that have won awards or some images that you have submitted to contests or sent to many publications. It is difficult to remember all this information for each of your images. So you need to keep a track. How can you do it? Create a MS-Word file for each of your images. NAME THAT WORD FILE EXACTLY SAME AS THE MASTER FILE/TIFF FILE SO IT IS EASY WHEN YOU WANT TO LOOK FOR THE CORRESPONDING RAW/TIFF OR WORD FILE. The only problem though will be if you have 500 good images, then you have to create 500 MS word files & that will consume lots of space & will take time if you want to access data from more than one word file. The best alternative to Word is MS OneNote. YOU CAN MAINTAIN AN ONENOTE FILE FOR EACH YEAR’S IMAGES OR THEME BASED OR BASED ON SHOOTING PLACES (For example, if you have images from Ladakh & Mumbai, you can create a OneNote for Ladakh & another for Mumbai). EACH PAGE OF ONE NOTE CAN BE USED FOR EACH OF YOUR IMAGES. Just name the page similar to the MasterFile/Tiff file.
Now what should each of these files contain? Well, it should contain advanced DETAILS OF YOUR IMAGE LIKE THE DATE & PLACE OF SHOOTING, THE CAMERA & LENS USED, EXIF DETAILS (It will help you to save time as looking for EXIF details from more than one Master file can take time), details of where you send/submit these images, where it has been published or if it has won any awards and any other details related to that particular image.
Now let’s look at how you can maintain items related to your photograph. Create another folder & name that folder as “Documentation.” This folder should contain subfolders, one for each of your image. Use the same name for these folders as your images are named in the master file/tiff file. This is the place you can keep all evidence, i.e., e-media, related to the image under consideration. For example if one of your images is published somewhere and you want to save it as your record for the future or if one of your images is used in an online poster, you may want to save it. Save such docs in these respective folders.
EXAMPLE: Check the image here at flic.kr/p/FTA1jU
In the 1st screen shot, you can see I have created a folder for each of my images under a folder named Document & in the 2nd Screen shot is a folder view of one of my image where I saved all related documents about that particular image. It helps me to locate any document related to the image if I need.
BACK UP
Here is the Most Important Part Of Image Management. Your laptop or desktop may not have enough space to store all these images & folders. Even if you have the space, it may slow down your system. So the best option is to keep those files & folders that are not in regular use in other storage mediums. Most importantly we cannot trust one electronic devise blindly because it can crash or malfunction at any time. I have often heard photographers complain of losing all their images because their system crashed. It’s a bad place to be in when that happens. It’s always better to be safe than sorry. TAKE BACK-UPS REGULARLY.
A proper back up means you need to store an image in… not one, not two as it’s commonly said but in THREE DIFFERENT PLACES. So, if your system is the first storage area, take a back-up in two other storage mediums.
The best back up for digital files is an Optical Storage Medium such as DVD but due to lack of space, it can be a costly affair & is also time consuming. The more popular choice right now is to SAVE IMAGES IN TWO DIFFERENT EXTERNAL HARD DRIVES. If you store an image in a hard drive, please read the manual carefully on how to protect them. You need to Connect The Hard Drives To A System Regularly otherwise you may lose data that is saved in it. Also some hard disks produce static electricity that can cause data loss. So read the manuals very carefully on how to manage the hard drive for maximum performance. Always keep them in a dry and safe place and use the pouch that you get in the pack when you buy it.
ANOTHER USEFUL STORAGE MEDIA IS CLOUD BASED STORAGE PLATFORMS. But its use comes at premium cost. First, you need to buy the space, then there are renewal/rental costs for the space and you need to pay for the internet data you will use while uploading and downloading images from this space as well. As your stock of images grows, it may turn out to be a very expensive storage medium.
A cheaper and reliable option is to use a service that offers a good amount of free space for the files that we use regularly. In this case, all you need to pay for is the internet data you will need to upload or download an image. This way, you can reduce almost half the expense you will incur if you opt for a paid cloud space.
One of the MOST POPULAR FREE CLOUD SPACE FOR IMAGES IF FLICKR. You can upload high resolution JPEG images & later download the original size or smaller sizes according to your need. Remember that many of our usage is online & for online usage, we do not need high resolution images. 72dpi images are used in almost all online applications. It is really time saving & an easy way to download your images from Flickr instead of resizing them always using PS.
Till now we have discussed standard procedures to manage your images. You can of course personalize any step that we have discussed so far in all three parts according to your preference or comfort. Contact me anytime if you have any queries.
|
|
|
|
|
|
|
|
|
1270 |
|
|
|
|
| |
|
| |
|
|
|
The world is celebrating today as World Photography Day and it is indeed a special day for all of us who love and practice photography. Usually, everyone celebrates this day by organizing photowalks, contests, lectures, seminars and lots of other exciting activities. Do you know why the date, 19th August, is celebrated as World Photography Day?
In 1829, Joseph Nicephore Niepce and Louis Daguerre started working jointly to develop a process that is easy and permanent. But Niepce died suddenly in 1833 and so Daguerre had to continue the experiment they started together, alone. He finally was able to develop a process in 1937 that made it more practical to capture a photograph and that needed seconds compared to all previous processes which needed long exposures for several minutes. This new process also made it possible to capture fine details in the picture. It was known as Daguerreotype Process. In a joint meeting between the French Academy of Sciences and the Academie des Beaux Arts that took place on 7th January 1839, Daguerre announced his new process publically in general terms keeping all specific details secret and got the process patented. Later, the French Government acquired the patented rights from Louis Daguerre in exchange for a lucrative offer of providing lifetime pensions for himself and Niepce’s son. A few months later, on 19th August, 1839, the French Government presented the invention as a GIFT from France that was “free to the world” and the complete working instructions were published publically. Daguerreotype Process became the basis of modern photography and the world started to celebrate 19th August as World Photography Day in honor of this kind gesture from France.
IMAGE of Niepec & Daguerre: flic.kr/p/FVV4tP
Here are some iconic images that you can enjoy today with to celebrate the day that is exclusively dedicated to us photographers.
The oldest surviving photograph: flic.kr/p/FZtEpJ
The most expensive photograph: flic.kr/p/FBE6Y5
The most viewed photograph: flic.kr/p/FZtDRj
The 1st digital photograph: flic.kr/p/F7jKBE
The largest photograph: flic.kr/p/FTASFL
Wish all of you a Happy World Photography Day and a photogenic year ahead. |
|
|
|
|
|
|
|
|
1116 |
|
|
|
|
| |
|
| |
|
Image Management - Part II
|
|
|
In Part-I, we learnt all about how to make two files for each of our images.
CURATING
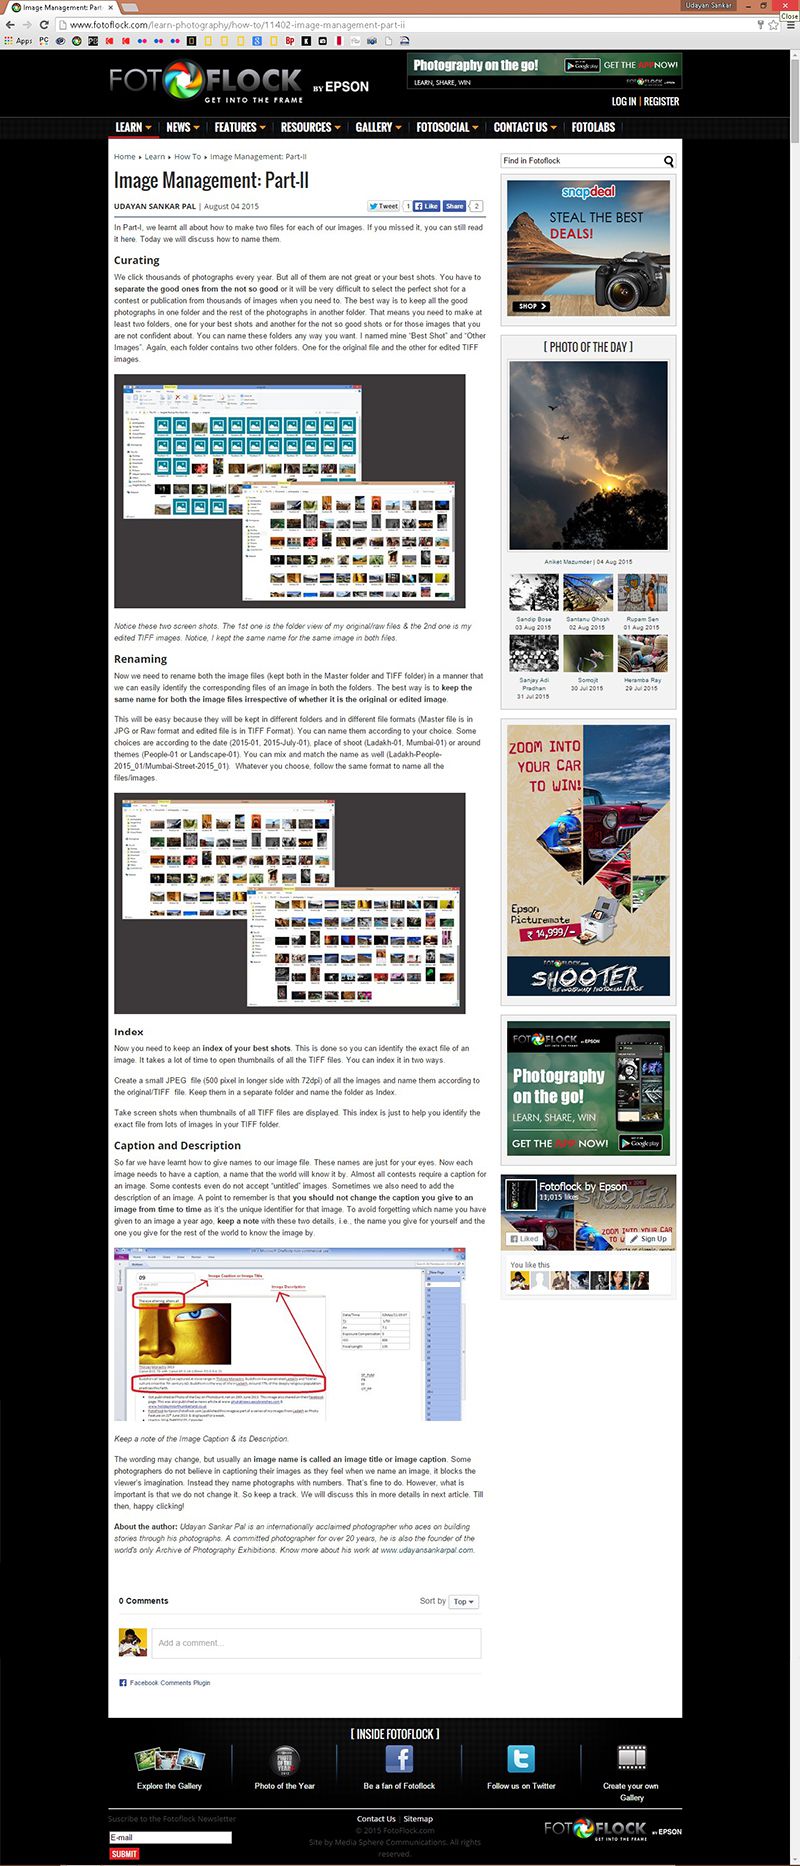
We click thousands of photographs every year. But all of them are not great or your best shots. You have to SEPARATE THE GOOD ONES FROM THE NOT SO GOOD or it will be very difficult to select the perfect shot for a contest or publication from thousands of images when you need. The best way is to keep all the good photographs in one folder & the rest of the photographs in another folder. That means you need to make at least two folders, one for your best shots & another for the not so good shots or for those images that you are not confident about. You can name these folders any way you want. I named mine “Best Shot” & “Other Images”. Again, each folder contains two other folders. One for the original file & the other for edited TIFF images.
EXAMPLE: See the image here at flic.kr/p/G1YnsH
Notice those two screen shots. The 1st one is the folder view of my original/raw files & the 2nd one is my edited TIFF images. Notice, I kept the same name for the same image in both files.
RENAMING
Now we need to rename both the image files (kept both in the Master folder & TIFF folder) in a manner that we can easily identify the corresponding files of an image in both the folders. The best way is to KEEP THE SAME NAME FOR BOTH THE IMAGE FILES IRRESPECTIVE OF WHETHER IT IS THE ORIGINAL OR EDITED IMAGE. This will be easy because they will be kept in different folders & in a different file formats (Master file is in JPG or Raw format & edited file is in TIFF Format). You can name them according to your choice. Some choices are according to the date (2015-01, 2015-July-01), place of shoot (Ladakh-01, Mumbai-01) or around themes (People-01 or Landscape-01). You can mix and match the name as well (Ladakh-People-2015_01/Mumbai-Street-2015_01). Whatever you choose, follow the same format to name all the files/images.
EXAMPLE: See the image here at flic.kr/p/FSNAts
INDEX
Now you need to keep an INDEX OF YOUR BEST SHOTS. This is done so you can identify the exact file of an image. It takes a lot of time to open thumbnails of all the TIFF files. You can index it in two ways.
1. Create a small JPEG file (500 pixel in longer side with 72dpi) of all the images & name them according to the original/TIFF file. Keep them in a separate folder & name the folder as Index.
2. Take screen shots when thumbnails of all TIFF files are displayed. This index is just to help you identify the exact file from lots of images in your TIFF folder.
CAPTION & DESCRIPTION
So far we have learnt how to give names to our image file. These names are just for your eyes. Now each image needs to have a caption, a name that the world will know it by. Almost all contests require a caption for an image. Some contests even do not accept “untitled” images. Sometimes we also need to add the description of an image. A point to remember is that YOU SHOULD NOT CHANGE THE CAPTION YOU GIVE TO AN IMAGE FROM TIME TO TIME as it’s the unique identifier for that image. To avoid forgetting which name you have given to an image a year ago, KEEP A NOTE with these two details, i.e., the name you give for yourself and the one you give for the rest of the world to know the image by.
EXAMPLE: See the image here at flic.kr/p/FSNz2Q
Keep a note of the Image Caption & its Description.
The wording may change, but usually an IMAGE NAME IS CALLED AN IMAGE TITLE OR IMAGE CAPTION. Some photographers do not believe in captioning their images as they feel when we name an image, it blocks the viewer’s imagination. Instead they name photographs with numbers. That’s fine to do. However, what is important is that we do not change it. So keep a track. We will discuss this in more details in next article. |
|
|
|
|
|
|
|
|
|
1086 |
|
|
|
|
| |
|
| |
|
5 Tips to Take Great Photographs of New Born Babie
|
|
|
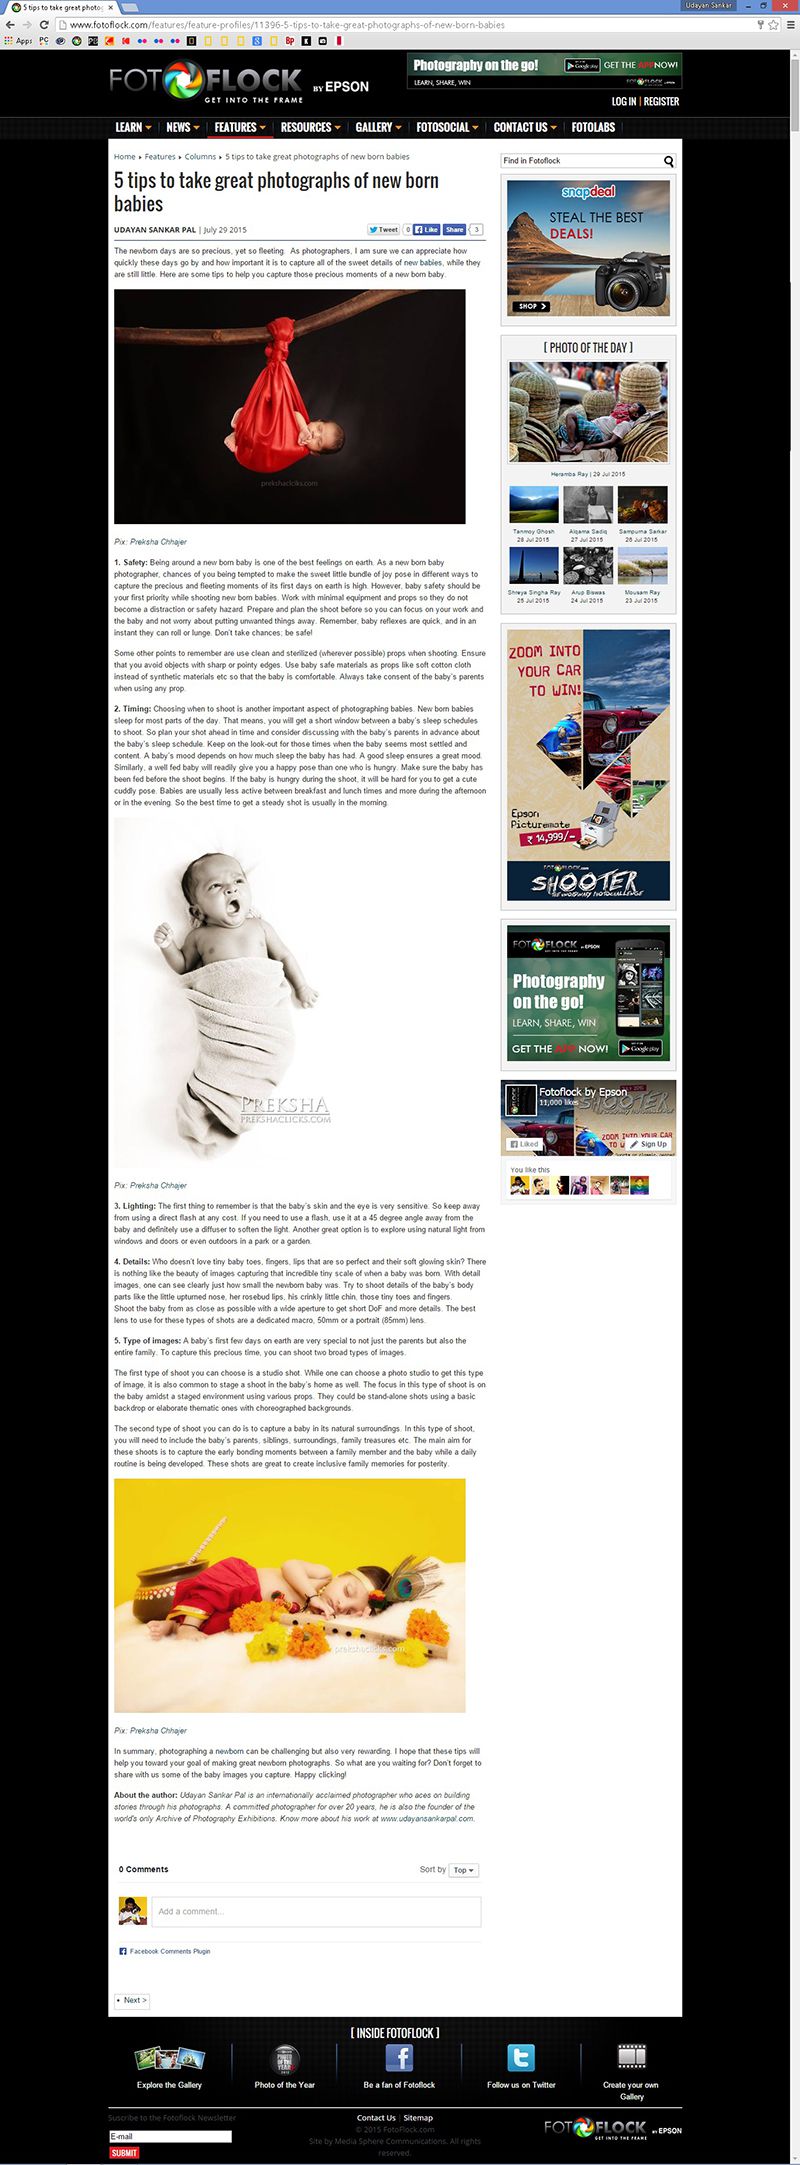
The newborn days are so precious, yet so fleeting. As photographers, I am sure we can appreciate how quickly these days go by and how important it is to capture all of the sweet details of new babies, while they are still little. Here are some tips to help you capture those precious moments of a new born baby.
1. SAFETY: Being around a new born baby is one of the best feelings on earth. As a new born baby photographer, chances of you being tempted to make the sweet little bundle of joy pose in different ways to capture the precious and fleeting moments of its first days on earth is high. However, baby safety should be your first priority while shooting new born babies. Work with minimal equipment and props so they do not become a distraction or safety hazard. Prepare and plan the shoot before so you can focus on your work and the baby and not worry about putting unwanted things away. Remember, baby reflexes are quick, and in an instant they can roll or lunge. Don’t take chances; be safe!
Some other points to remember are use clean and sterilized (wherever possible) props when shooting. Ensure that you avoid objects with sharp or pointy edges. Use baby safe materials as props like soft cotton cloth instead of synthetic materials etc so that the baby is comfortable. Always take consent of the baby’s parents when using any prop.
2. TIMING: Choosing when to shoot is another important aspect of photographing babies. New born babies sleep for most parts of the day. That means, you will get a short window between a baby’s sleep schedules to shoot. So plan your shot ahead in time and consider discussing with the baby’s parents in advance about the baby’s sleep schedule. Keep on the look-out for those times when the baby seems most settled and content. A baby’s mood depends on how much sleep the baby has had. A good sleep ensures a great mood. Similarly, a well fed baby will readily give you a happy pose than one who is hungry. Make sure the baby has been fed before the shoot begins. If the baby is hungry during the shoot, it will be hard for you to get a cute cuddly pose. Babies are usually less active between breakfast and lunch times and more during the afternoon or in the evening. So the best time to get a steady shot is usually in the morning.
3. LIGHTING: The first thing to remember is that the baby’s skin and the eye is very sensitive. So keep away from using a direct flash at any cost. If you need to use a flash, use it at a 45 degree angle away from the baby and definitely use a diffuser to soften the light. Another great option is to explore using natural light from windows and doors or even outdoors in a park or a garden.
4. DETAILS: Who doesn’t love tiny baby toes, fingers, lips that are so perfect and their soft glowing skin? There is nothing like the beauty of images capturing that incredible tiny scale of when a baby was born. With detail images, one can see clearly just how small the newborn baby was. Try to shoot details of the baby’s body parts like the little upturned nose, her rosebud lips, his crinkly little chin, those tiny toes and fingers.
Shoot the baby from as close as possible with a wide aperture to get short DoF and more details. The best lens to use for these types of shots are a dedicated macro, 50mm or a portrait (85mm) lens.
5. TYPE OF IMAGES: A baby’s first few days on earth are very special to not just the parents but also the entire family. To capture this precious time, you can shoot two broad types of images.
The first type of shoot you can choose is a studio shot. While one can choose a photo studio to get this type of image, it is also common to stage a shoot in the baby’s home as well. The focus in this type of shoot is on the baby amidst a staged environment using various props. They could be stand-alone shots using a basic backdrop or elaborate thematic ones with choreographed backgrounds.
The second type of shoot you can do is to capture a baby in its natural surroundings. In this type of shoot, you will need to include the baby’s parents, siblings, surroundings, family treasures etc. The main aim for these shoots is to capture the early bonding moments between a family member and the baby while a daily routine is being developed. These shots are great to create inclusive family memories for posterity.
In summary, photographing a newborn can be challenging but also very rewarding. I hope that these tips will help you toward your goal of making great newborn photographs. So what are you waiting for? Don’t forget to share with us some of the baby images you capture. |
|
|
|
|
|
|
|
|
1084 |
|
|
|
|
| |
|
| |
|
Image Management - Part I
|
|
|
Today, we will discuss about something different from the actual act of shooting an image, yet a topic that is very relevant to all of us. We will talk about how to manage the images you shoot. We will concentrate on three main steps in this series, SHOOTING FORMATS, i.e., should we shoot in JPEG or RAW, SAVING IMAGES, i.e, how to save our image with least quality loss & ARCHIVING IMAGES, i.e., how to archive our work of art. Let’s start with the first step…
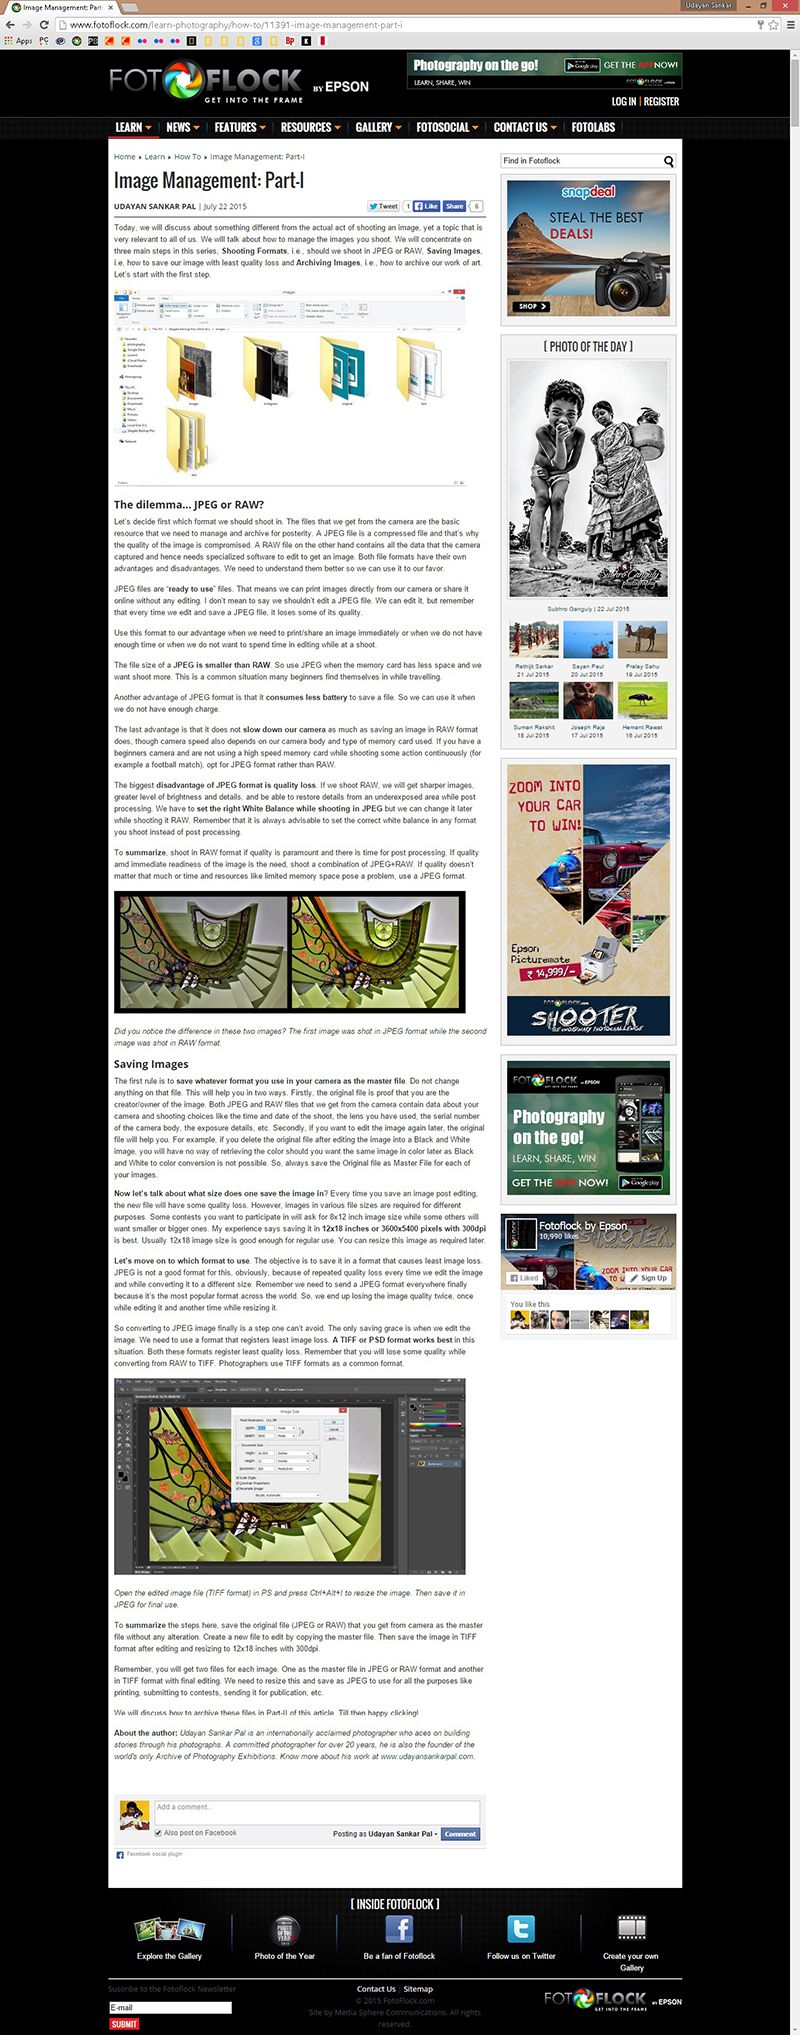
EXAMPLE: See the image here at flic.kr/p/F7zq6p
1. THE DILEMMA… JPEG OR RAW?
Let’s decide first which format we should shoot in. The files that we get from the camera are the basic resource that we need to manage and archive for posterity. A JPEG file is a compressed file and that’s why the quality of the image is compromised. A RAW file on the other hand contains all the data that the camera captured hence needing specialized software to edit to get an image. Both file formats have their own advantages & disadvantages. We need to understand them better so we can use it to our favor.
JPEG files are “READY TO USE” files. That’s mean we can print images directly from our camera or share it online without any editing. I don’t mean to say we shouldn’t edit a JPEG file. We can edit it, but remember that every time we edit & save a JPEG file, it loses some of its quality.
Use this format to our advantage when we need to print/share an image immediately or when we do not have enough time or when we do not want to spend time in editing while at a shoot.
The file size of a JPEG IS SMALLER THAN RAW. So use JPEG when the memory card has less space and we want shoot more. This is a common situation many beginners find themselves in while travelling.
Another advantage of JPEG format is that it CONSUMES LESS BATTERY to save a file. So we can use it when we do not have enough charge in our battery.
The last advantage is that it does not SLOW DOWN OUR CAMERA as much as saving an image in RAW format does, though camera speed also depends on our camera body & type of memory card used. If you have a beginners camera & are not using a high speed memory card while shooting some action continuously (for example a football match), opt for JPEG format rather than RAW.
The biggest DISADVANTAGE OF JPEG FORMAT IS QUALITY LOSS. If we shoot RAW, we will get sharper images, greater level of brightness & details and be able to restore details from an underexposed area while post processing. We have to SET THE RIGHT WHITE BALANCE WHILE SHOOTING IN JPEG but we can change it later while shooting it RAW. Remember that it is always advisable to set the correct white balance in any format you shoot instead of post processing.
To SUMMARIZE, shoot in RAW format if quality is paramount & there is time for post processing. If quality & immediate readiness of the image is the need, shoot a combination of JPEG+RAW. If quality doesn’t matter that much or time & resources like limited memory space pose a problem, use a JPEG format.
EXAMPLE: See the image here at flic.kr/p/FZxAQG
Did you notice the difference in these two images? The first image was shot in JPEG format while the second image was shot in RAW format.
2. SAVING IMAGES
The first rule is to Save Whatever Format You Use In Your Camera As The Master File. Do not change anything on that file. This will help you in two ways. Firstly, the original file is proof that you are the creator/owner of the image. Both JPEG and RAW files that we get from the camera contain data about your camera & shooting choices like the time & date of the shoot, the lens you have used, the serial number of the camera body, the exposure details, etc. Secondly, if you want to edit the image again later, the original file will help you. For example, if you delete the original file after editing the image into a Black&White image, you will have no way of retrieving the color should you want the same image in color later as Black&White to color conversion is not possible. So, always save the Original file as Master File for each of your images.
NOW LET’S TALK ABOUT WHAT SIZE DOES ONE SAVE THE IMAGE IN? Every time you save an image post editing, the new file will have some quality loss. However, images in various file sizes are required for different purposes. Some contests you want to participate in will ask for 8x12 inch image size while some others will want smaller or bigger ones. My experience says saving it in 12X18 INCHES OR 3600X5400 PIXELS WITH 300DPI is best. Usually 12x18 image size is good enough for regular use. You can resize this image as required later.
LET’S MOVE ON TO WHICH FORMAT TO USE? The objective is to save it in a format that causes least image loss. JPEG is not a good format for this obviously because of repeated quality loss every time we edit the image and while converting it to a different size. Remember we need to send a JPEG format everywhere finally because it’s the most popular format across the world. So, we end up losing the image quality twice, once while editing it and another time while resizing it.
So converting to JPEG image finally is a step one can’t avoid. The only saving grace is when we edit the image. We need to use a format that registers least image loss. A TIFF OR PSD FORMAT WORKS BEST in this situation. Both these formats register least quality loss. Remember that you will lose some quality while converting from RAW to TIFF. Photographers use TIFF formats as a common format.
EXAMPLE: See the image here at flic.kr/p/F7oG1J
Open the edited image file (TIFF format) in PS and press Ctrl+Alt+I to resize the image. Then save it in JPEG for final use.
To SUMMARIZE the steps here, save the original file (JPEG or RAW) that you get from camera as the master file without any alteration. Create a new file to edit by copying the master file. Then save the image in TIFF format after editing & resizing to 12x18 inches with 300dpi.
Remember, you will get two files for each image. One as the master file in JPEG or RAW format and another in TIFF format with final editing. We need to resize this & save as JPEG to use for all the purposes like printing, submitting to contests, sending it for publication, etc.
We will discuss how to archive these files in Part-II of this article. |
|
|
|
|
|
|
|
|
1082 |
|
|
|
|
| |
|
| |
|
Must Have Filters for Beginners
|
|
|
Lens Filters are used for different purposes. For example, it helps us to capture beautiful colors, avoid reflection or at times helps in protecting the lens. A lot of beginners make the mistake of thinking that we can avoid filters & manage the effect while post-processing in PhotoShop or LightRoom. Yes, we can manage the effect to some extent but we cannot change or avoid them totally. The ultimate objective of using a filter is to ensure that the quality of light that hits the sensor is perfect.
So then the question is, what are the filters that one must have? Read on…
1. UV FILTERS
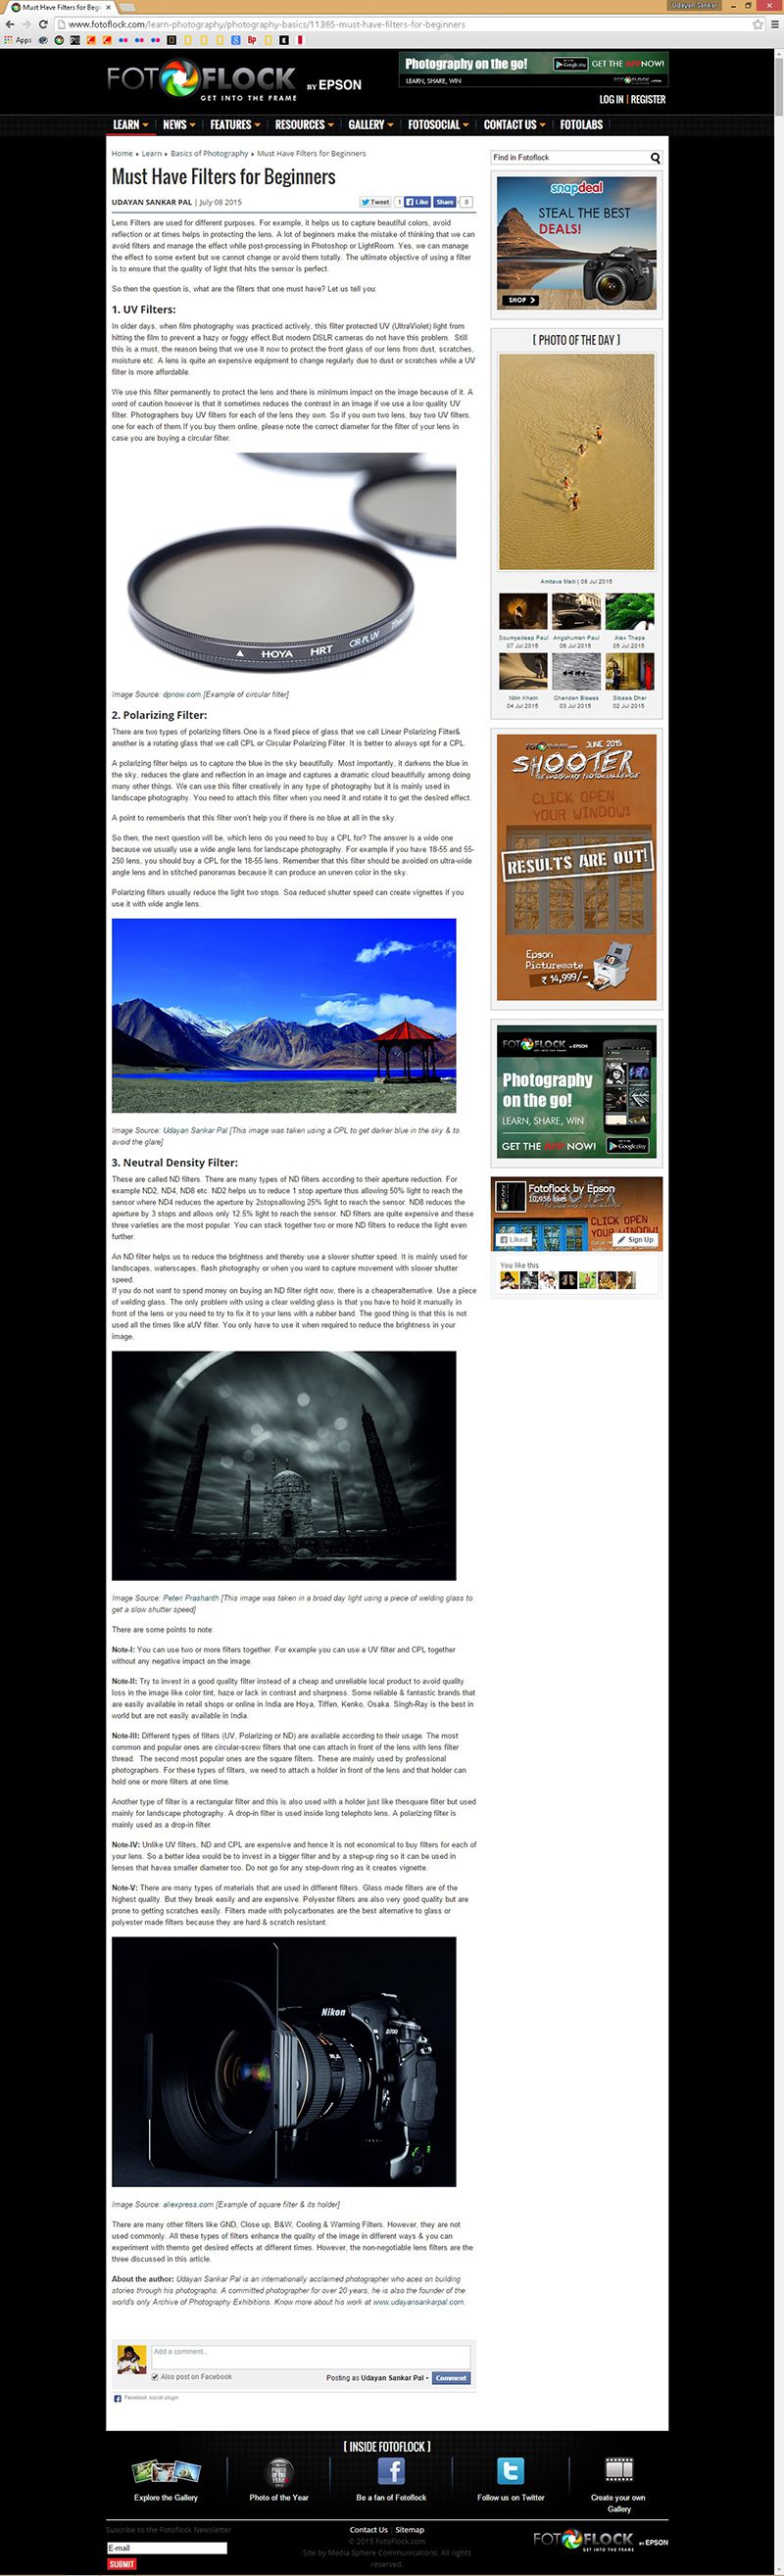
In older days, when film photography was practiced actively, this filter protected UV (Ultra Violet) light from hitting the film to prevent a hazy or foggy effect. But modern DSLR cameras do not have this problem. Still this is a “must have” filter! The simple reason is because we use it now to protect the front glass of our lens from dust, scratches, moisture etc. A lens is quite an expensive equipment to change regularly due to dust or scratches while a UV filter is more affordable. So adding this filter is a wise choice right?
We use this filter permanently to protect the lens and there is minimum impact on the image because of it. A word of caution however is that it sometimes reduces the contrast in an image if we use a low quality UV filter. Photographers buy UV filters for each of the lens they own. So if you own two lens, buy two UV filters, one for each of them. If you buy them online, please note the correct diameter for the filter of your lens in case you are buying a circular filter.
2. POLARIZING FILTER
There are two types of polarizing filters. One is a fixed piece of glass that we call Linear Polarizing Filter & another is a rotating glass that we call CPL or Circular Polarizing Filter. It is better to always opt for a CPL.
A polarizing filter helps us to capture the blue in the sky beautifully. Most importantly, it darkens the blue in the sky, reduces the glare and reflection in an image and captures a dramatic cloud beautifully among doing many other things. We can use this filter creatively in any type of photography but it is mainly used in landscape photography. You need to attach this filter when you need it & rotate it to get the desired effect.
A point to remember is that this filter won’t help you if there is no blue at all in the sky.
So then, the next question will be, which lens do you need to buy a CPL for? The answer is a wide one because we usually use a wide angle lens for landscape photography. For example if you have 18-55 & 55-250 lens, you should buy a CPL for the 18-55 lens. Remember that this filter should be avoided on ultra-wide angle lens & in stitched panoramas because it can produce an uneven color in the sky.
Polarizing filters usually reduce the light two stops. So a reduced shutter speed can create vignettes if you use it with wide angle lens. To summarize, use this lens wisely!
3. NEUTRAL DENSITY FILTER
We call these ND filters. There are many type of ND filters according to their aperture reduction. For example ND2, ND4, ND8 etc. ND2 helps us to reduce 1stop aperture thus allowing 50% light to reach the sensor where ND4 reduces the aperture by 2 stops allowing 25% light to reach the sensor. ND8 reduces the aperture by 3 stops & allows only 12.5% light to reach the sensor. ND filter is quite expensive & these three varieties are the most popular. You can stack together two or more ND filters to reduce the light even further.
An ND filter helps us to reduce the brightness & thereby use a slower shutter speed. It is mainly used for landscapes, waterscapes, flash photography or when you want to capture movement with slower shutter speed.
If you do not want to spend money on buying an ND filter right now, there is a cheaper alternative. Use a piece of welding glass. The only problem with using a clear welding glass is that you have to hold it manually in front of the lens or you need to try to fix it to your lens with a rubber band. The good thing is that this is not used all the times like a UV filter. You only have to use it when required to reduce the brightness in your image.
There are some points to note though.
NOTE-I
You can use two or more filters together. For example you can use a UV filter & CPL together without any negative impact on the image.
NOTE-II
Try to invest in a good quality filter instead of a cheap & unreliable local product to avoid quality loss in the image like color tint, haze or lack in contrast & sharpness. Some reliable & fantastic brands that are easily available in retail shops or online in India are Hoya, Tiffen, Kenko, Osaka. Singh-Ray is the best in world but those are not easily available in India.
NOTE-III
Different types of these filters (UV, Polarizing or ND) are available according to their usage. The most common & popular ones are circular-screw filters that one can attach in front of the lens with lens filter thread. The second most popular ones are the square filters. These are mainly used by professional photographers. For these type of filters, we need to attach a holder in front of the lens & that holder can hold one or more filters at one time.
Another type of filter is a rectangular filter & this is also used with a holder just like the square filter but used mainly for landscape photography. A drop-in filter is used inside long telephoto lens. A polarizing filter is mainly used as a drop-in filter.
NOTE-IV
Unlike UV filters, ND & CPL are expensive & hence it is not economical to buy filters for each of your lens. So a better idea would be to invest in a bigger filter and by a step-up ring so it can be used in lenses that have a smaller diameter too. Do not go for any step-down ring as it creates vignette.
NOTE-V
There are many types of materials that are used in different filters. Glass made filters are of the highest quality. But they break easily & are expensive. Polyester filters are also very good quality but are prone to getting scratches easily. Filters made with polycarbonates are the best alternative to glass or polyester made filters because they are hard & scratch resistant.
There are many other filters like GND, Close up, B&W, Cooling & Warming Filters. However, they are not used commonly. All these types of filters enhance the quality of the image in different ways & you can experiment with them to get desired effects at different times. However, the non-negotiable lens filters are the three we discussed in this article. So add it to your kitty now… |
|
|
|
|
|
|
|
|
|
1080 |
|
|
|
|
| |
|
| |
|
50mm Prime - A photographer Favourite Lens
|
|
|
One of the most frequently asked question by beginners is “which is your favorite lens?” The answer is always 50mm prime. You will get the same answer across the world from all photographers. So, what are the reasons that make this lens so popular among the photographers?
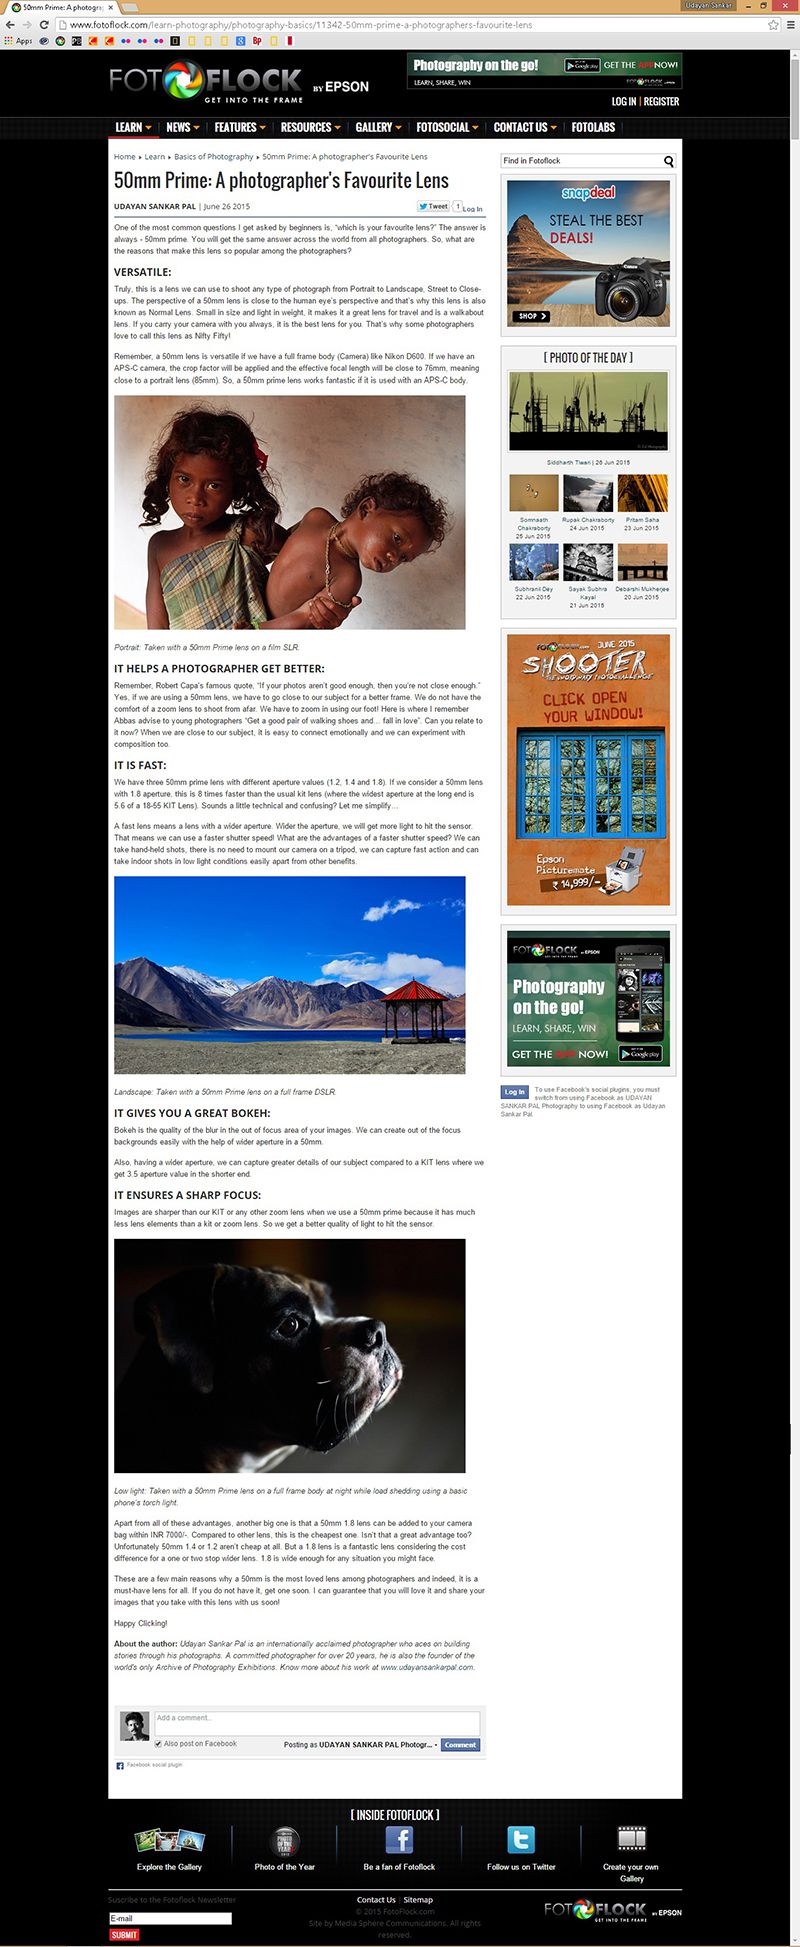
1. VERSATILE: Truly, this is a lens we can use to shoot any type of photograph from Portrait to Landscape, Street to Close-ups. The perspective of a 50mm lens is close to the human eye’s perspective and that’s why this lens is also known as Normal Lens. Small in size & light in weight, it makes it a great lens for travel & is a walkabout lens. If you carry your camera with you always, it is the best lens for you. That’s why some photographers love to call this lens as Nifty Fifty!
Remember, a 50mm lens is versatile if we have a full frame body (Camera) like Nikon D600. If we have an APS-C camera, the crop factor will be applied & the effective focal length will be close to 76mm, meaning close to a portrait lens (85mm). So, a 50mm prime lens works fantastic if it is used with an APS-C body.
EXAMPLE: Check the image here at flic.kr/p/ft2W2K
Portrait: Taken with a 50mm Prime lens on a film SLR.
2. IT MAKES US A BETTER PHOTOGRAPHER: Remember, Robert Capa’s famous quote, “If your photos aren’t good enough, then you’re not close enough.” Yes, if we are using a 50mm lens, we have to go close to our subject for a better frame. We do not have the comfort of a zoom lens to shoot from afar. We have to zoom in using our foot! Here is where I remember Abbas advise to young photographers “Get a good pair of walking shoes and… fall in love”. Can you relate to it now? When we are close to our subject, it is easy to connect emotionally & we can experiment with composition too.
3. IT IS FAST: We have three 50mm prime lens with different aperture values (1.2, 1.4 & 1.8). If we consider a 50mm lens with 1.8 aperture, this is 8 times faster than the usual kit lens (where the widest aperture at the long end is 5.6 of a 18-55 KIT Lens). Sounds a little technical & confusing? Let me simplify…
A fast lens means a lens with a wider aperture. Wider the aperture, we will get more light to hit the sensor. That means we can use a faster shutter speed! What are the advantages of a faster shutter speed? We can take hand-held shots, there is no need to mount our camera on a tripod, we can capture fast action and can take indoor shots in low light conditions easily apart from other benefits.
EXAMPLE: Check the image here at flic.kr/p/fiYiTz
Landscape: Taken with a 50mm Prime lens on a full frame DSLR.
4. IT GIVES YOU A GREAT BOKEH: Bokeh is the quality of the blur in the out of focus area of your images. We can create out of the focus backgrounds easily with the help of wider aperture in a 50mm.
Also, having a wider aperture, we can capture greater details of our subject compared to a KIT lens where we get 3.5 aperture value in the shorter end.
5. IT ENSURES A SHARP FOCUS: Images are sharper than our KIT or any other zoom lens when we use a 50mm prime because it has much less lens elements than a kit or zoom lens. So we get a better quality of light to hit the sensor.
EXAMPLE: Check the image here at flic.kr/p/fjnYtt
Low light: Taken with a 50mm Prime lens on a full frame body at night while load shedding using a basic phone’s torch light.
Apart from all of these advantages, another big one is that a 50mm 1.8 lens can be added to your camera bag within INR 7000/-. Compared to other lens, this is the cheapest one. Isn’t that a great advantage too? Unfortunately 50mm 1.4 or 1.2 aren’t cheap at all. But a 1.8 lens is a fantastic lens considering the cost difference for a one or two stop wider lens. 1.8 is wide enough for any situation you might face.
These are a few main reasons why a 50mm is the most loved lens among photographers & indeed, it is a must have lens for all. If you do not have it, get one soon. I can guarantee that you will love it & share your images that you take with this lens with us soon! |
|
|
|
|
|
|
|
|
1078 |
|
|
|
|
| |
|
| |
|
|
|
George Eastman once said, LIGHT MAKES PHOTOGRAPHY. EMBRACE LIGHT. ADMIRE IT. LOVE IT. BUT ABOVE ALL, KNOW LIGHT. KNOW IT FOR ALL YOU ARE WORTH, AND YOU WILL KNOW THE KEY TO PHOTOGRAPHY. The most important element in photography is light & that’s why we need to understand it clearly.
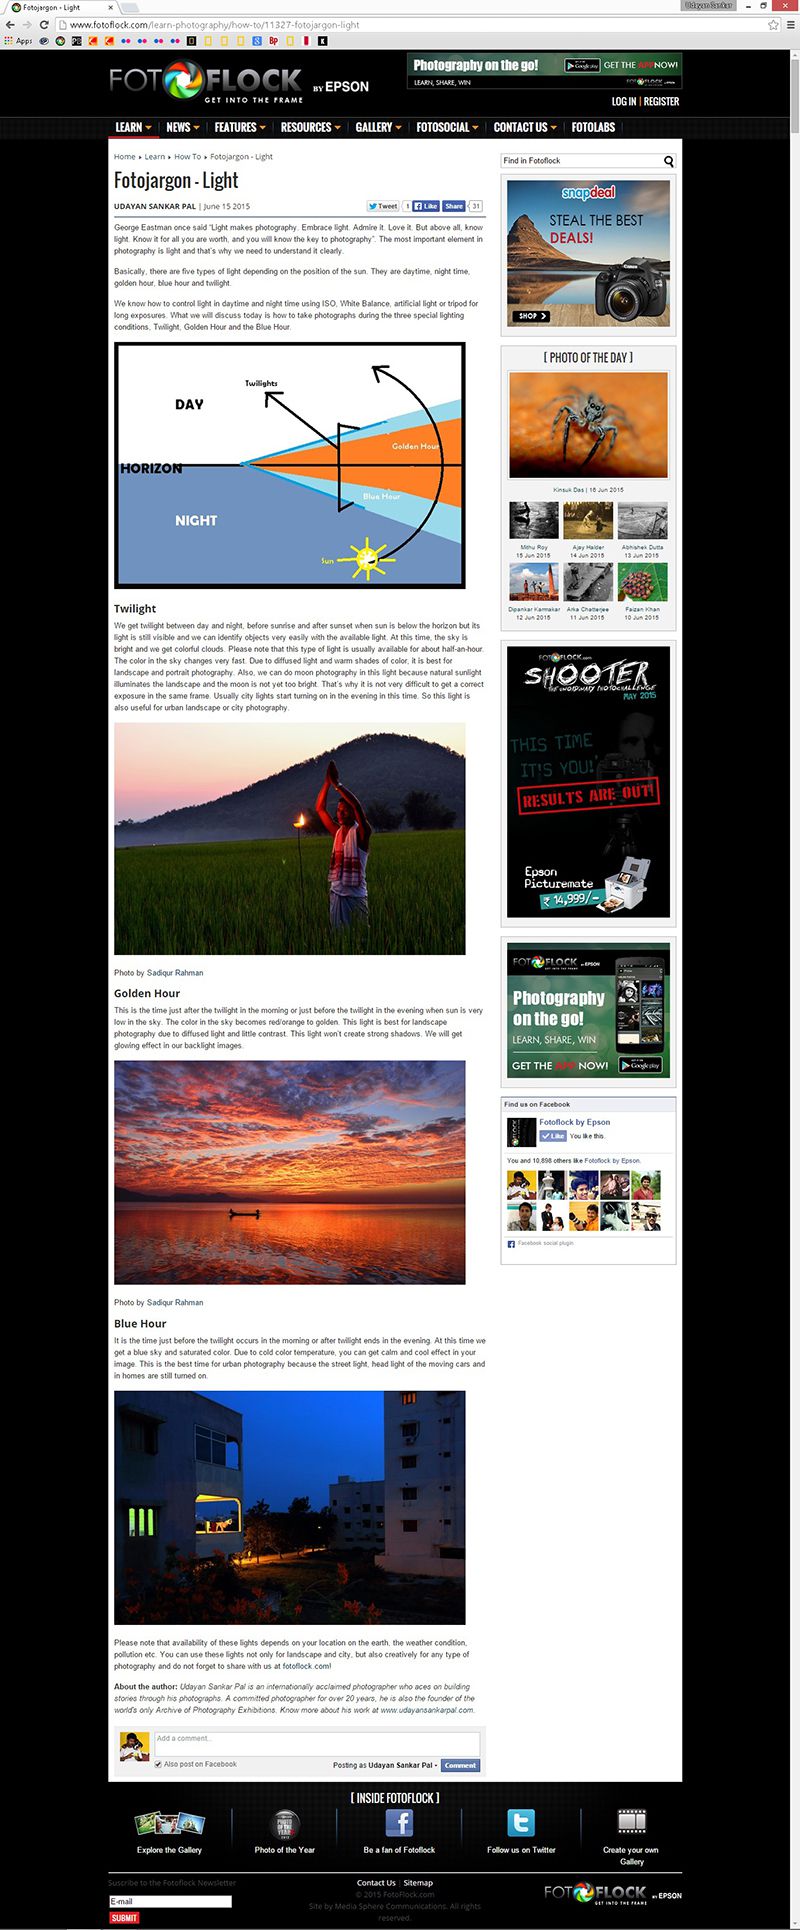
Basically there are five types of light depending on the position of the sun. They are daytime, night time, golden hour, blue hour & twilight.
We know how to control light in daytime & night time using ISO, White Balance, artificial light or tripod for long exposures. What we will discuss today is how to take photographs during the three special lighting conditions, Twilight, Golden Hour and the Blue Hour.
EXAMPLE: See this photograph first to understand the five type of light here at flic.kr/p/F5YFYJ
1. TWILIGHT
We get twilight between day & night, before sunrise & after sunset when sun is below the horizon but its light is still visible & we can identify objects very easily with the available light. At this time, the sky is bright & we get colorful clouds. Please note that this type of light is usually available for about half-an-hour. The color in the sky changes very fast. Due to diffused light & warm shades of color, it is best for landscape & portrait photography. Also, we can do moon photography in this light because natural sunlight illuminates the landscape & the moon is not yet too bright. That’s why it is not very difficult to get a correct exposure in the same frame. Usually city lights start turning on in the evening in this time. So this light is also useful for urban landscape or city photography.
2. GOLDEN HOUR
This is the time just after the twilight in the morning or just before the twilight in the evening when sun is very low in the sky. The color in the sky becomes red/orange to golden. This light is best for landscape photography due to diffused light & little contrast. This light won’t create strong shadows. We will get glowing effect in our backlight images.
3. BLUE HOUR
It is the time just before the twilight occurs in the morning or after twilight ends in the evening. At this time we get a blue sky & saturated color. Due to cold color temperature, you can get calm & cool effect in your image. This is the best time for urban photography because the street light, head light of the moving cars & lights in homes are still turned on.
Please note that availability of these lights depends on your location on the earth, the weather condition, pollution etc. You can use these lights not only for landscape & city, but also creatively for any type of photography & do not forget to share with us at fotoflock.com! |
|
|
|
|
|
|
|
|
1076 |
|
|
|
|
| |
|
| |
|
Famous Photography Quotes Decoded - Part III
|
|
|
This article is the last one in this series. We have discussed a few quotes in the previous two articles. Those quotes & the few that we will discuss today will help you or any beginner be a good photographer & help you gain clarity in your thinking process towards photography.
7. A LOT OF PHOTOGRAPHERS THINK THAT IF THEY BUY A BETTER CAMERA THEY’LL BE ABLE TO TAKE BETTER PHOTOGRAPHS. A BETTER CAMERA WON’T DO A THING FOR YOU IF YOU DON’T HAVE ANYTHING IN YOUR HEAD OR IN YOUR HEART. -Arnold Newman
So, does this quote mean that you do not need the most modern or up-to-date camera? I know many people believe that the camera is not important, it is the person behind the camera, you who is most important. Yes, the second part of the sentence is absolutely true. You are the important element of your image. But a good camera as well as equipment like printer, tripod, etc is also important. Just as without knowing the basics of photography, you cannot produce a world class image, so too, you cannot produce world class images constantly with just a basic camera. You need to upgrade your camera & your equipment alongside your skill in photography. A better camera alone can’t certainly make you a better photographer. You need to have a better camera along with developing your skill at photography to make a lasting impact.
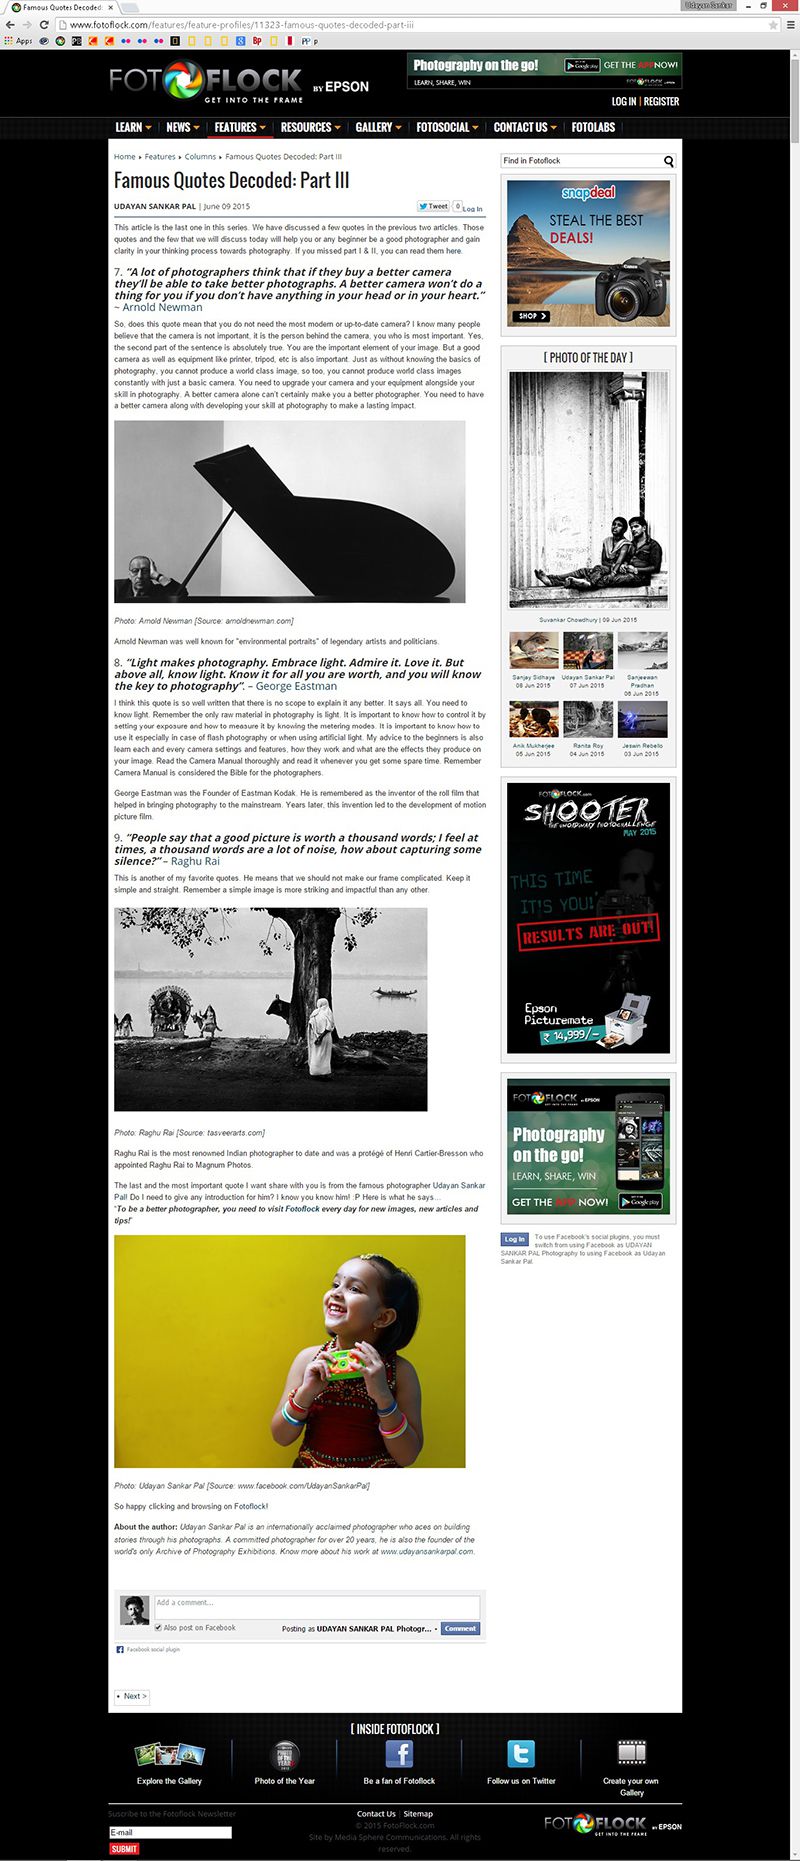
Arnold Newman was well known for “environmental portraits” of legendary artists and politicians.
8. LIGHT MAKES PHOTOGRAPHY. EMBRACE LIGHT. ADMIRE IT. LOVE IT. BUT ABOVE ALL, KNOW LIGHT. KNOW IT FOR ALL YOU ARE WORTH, AND YOU WILL KNOW THE KEY TO PHOTOGRAPHY . -George Eastman
I think this quote is so well written that there is no scope to explain it any better. It says all. You need to know light. Remember the only raw material in photography is light. It is important to know how to control it by setting your exposure & how to measure it by knowing the metering modes. It is important to know how to use it especially in case of flash photography or when using artificial light. My advice to the beginners is also learn each & every camera settings & features, how they work & what are the effects they produce on your image. Read the Camera Manual thoroughly & read it whenever you get some spare time. Remember Camera Manual is considered the Bible for the photographers.
George Eastman was the Founder of Eastman Kodak. He is remembered as the inventor of the roll film that helped in bringing photography to the mainstream. Years later, this invention led to the development of motion picture film.
9. PEOPLE SAY THAT A GOOD PICTURE IS WORTH A THOUSAND WORDS; I FEEL AT TIMES, A THOUSAND WORDS ARE A LOT OF NOISE, HOW ABOUT CAPTURING SOME SILENCE? -Raghu Rai
This is another of my favorite quotes. He means that we should not make our frame complicated. Keep it simple & straight. Remember a simple image is more striking & impactful than any other.
Raghu Rai is the most renowned Indian photographer to date & was a protege of Henri Cartier-Bresson who appointed Raghu Rai to Magnum Photos.
The last & most important quote I want share with you is from the famous photographer Udayan Sankar Pal! Do I need to give any introduction for him? I know you know him! :P Here is what he says, TO BE A BETTER PHOTOGRAPHER, YOU NEED TO VISIT FOTOFLOCK EVERY DAY FOR NEW IMAGES, NEW ARTICLES & TIPS!
So happy clicking and browsing on Fotoflock! |
|
|
|
|
|
|
|
|
|

1074 |
|
|
|
|
| |
|
| |
|
Famous Photography Quotes Decoded - Part II
|
|
|
Today we will discuss some more famous quotes of legendary photographers. Memorize them as your success mantras for photography.
4. PHOTOGRAPHERS MISTAKE THE EMOTION THEY FEEL WHILE TAKING THE PHOTO AS A JUDGMENT THAT THE PHOTOGRAPH IS GOOD. -Garry Winogrand
In simple words, criticize your photograph. Judge it objectively. Don’t mix your emotions with the photograph. For example, it is possible that your loved one’s portrait that you clicked is not really a great photograph. Sometimes, we spend hours or walk miles for a single shot. When we come home, we feel that the photograph is fantastic because we spent a long time to click it. Forget the experience you went through when you look at the image.
I know many photographers who edit their image after a few days when they are calm & in a composed frame of mind. It helps them to filter the emotional connect with that particular shot. My advice too is to not edit instantly after coming back from a shoot. If you edit the image on the same day, there is a high chance that you and your brain will be too tired to make an objective decision. Also, since your experience is very fresh in your memory then, you will not be able to judge the image objectively.
Garry Winogrand is widely considered as one of the greatest photographers of the twentieth century & is known for his New York Street Photography & American life.
5. THE WHOLE POINT OF TAKING PICTURES IS SO THAT YOU DON’T HAVE TO EXPLAIN THINGS WITH WORDS. -Elliott Erwitt
Simply put, we can explain an image and the reason behind our choice of frame and subject to our family & friends when we show them our images. However, if you want your images to be seen and appreciated by a larger audience, you have to tell them the reason for your choice through your images alone.
I remember a TED Talk episode by NatGeo photographer Paul Nicklen (you can watch it here at goo.gl/w8xgrs).. Talking about Nat geo, he says, NATGEO PUBLISHES PICTURES, NOT AN EXCUSE. It’s perhaps not directly linked with what Erwitt said but somehow is interrelated. We are photographers & people want to see our images. We cannot show them an excuse for not being able to click pictures correctly and we cannot explain what we couldn’t capture in that frame.
Ansel Adams once said, THERE ARE NO RULES FOR GOOD PHOTOGRAPHS, THERE ARE ONLY GOOD PHOTOGRAPHS. He meant there is no place for images that need words to explain or an excuse to gain ground. So, show the world those images that are good. Arko Mukhopadhyay explained in an article how to select your images and create a strong portfolio. You can read it here at goo.gl/ppqpjq.
Elliott Erwitt is well known for his black and white, candid shots of ironic and absurd situations within everyday settings— a master of Henri Cartier-Bresson’s “decisive moment”, you can see his images at elliotterwitt.com.
6. … WE ARE THERE WITH OUR CAMERAS TO RECORD REALITY. ONCE WE START MODIFYING THAT WHICH EXISTS, WE ARE ROBBING PHOTOGRAPHY OF ITS MOST VALUABLE ATTRIBUTE. -Philip Jones Griffiths
Now this statement is a little complicated & controversial. Some people believe in editing out unnecessary things from an image. Here comes the difference between photoart & photography. Photoart is also a part of photography where you can remove or add elements to make an image beautiful & create a story like a painter perhaps who can decide whether to add or to not add anything that he/she wants in his/her canvas. In photography though, we shouldn’t be tempted to do that because then we won’t be showing the reality of the moment if we change the value of any element in that image. It is absolutely necessary not to edit out/add anything from/to a picture in case of photojournalism. If on the other hand, you want to create a piece of creative art using photography, you are free to do anything to make a frame beautiful. So, be clear about your goal. Both approaches are accepted in the world of photography but in different platforms. For example, an edited image (which I called photoart earlier) is widely accepted in photo salons worldwide but in many photography contests like the most prestigious World Press Photo Contest, it is not accepted at all.
Philip Jones Griffiths was a legendary Magnum photographer who over decades, documented the toll of war & is well known for his images from Vietnam.
There are lots of quotes & advice from legendary photographers. I have selected a few of those that are my favorite. You can always Google & study these quotes to develop your knowledge. |
|
|
|
|
|
|
|
|
1072 |
|
|
|
|
| |
|
| |
|
Are You Keeping a Track of Your Images Online?
|
|
|
I wanted to dedicate today’s topic to Google Image Search, also known as reverse Image Search. However, before I start I wanted to emphasize on why photographers need it?
This is directly related to the watermark you place on your image. The dilemma we often face is that if we use a bold & big watermark across our image, there is virtually no chance that our image will be used in an unauthorized fashion anywhere. However, the image loses its aesthetic appeal. On the other hand, if we use the watermark in an aesthetic manner and place it at the corner of our image, there are high chances that people can make unauthorized use of your image or even more extreme would be when people remove or crop out the watermark & use it in a clandestine manner. (If you want to know how to use an aesthetically beautiful watermark, click here at goo.gl/spjtyb to read Amit Singh’s article that was published in Fotoflock.) Some people can steal your image & use it as their own without giving you any monetary benefit or credit to you. This is the reason we need Google Image Search. Still wondering why? Read on…
With all the possible risk, some photographers like me still do not want to add any watermark on our images. There are many reasons for not using watermark on our images. One is of course because we think that watermark spoils the aesthetic beauty of an image. Secondly, we upload our images to Flickr hoping to sell them directly via Getty Images. Many photographers like me, sell their images regularly via Getty or iStock license from Flickr & those images are available for public view in Flickr. Unfortunately, it also shows up in free search engines like Google search. People can easily download them & use it as their own. Also, a 72dpi low resolution image with 500pixel in the shorter side is good enough to publish online, so it makes it easy for people to misuse our images. Thirdly, many contests do not accept images with watermark as an entry criterion. Again here, some of these contests publish the entries online for many reasons like voting, result announcements, public showcase, etc. Those images also come up in Google search.
So, how can we protect our images from being used in an unauthorized manner? How can we find the balance between not wanting to use the watermark and still keeping our image safe from misuse?
Another option apart from watermark is to register your images with copyright act. But it is a tedious and expensive process to do that. Additionally, it involves a court battle that could be costly & time consuming.
In many cases, you can send a mail to the person or organization who used your image unlawfully asking for compensation and photo credit. I do this often if someone uses my image commercially. However, if it is not used commercially like in a blog post, I ask only to add a credit line or remove my image from their site. In almost all such cases, I get an apologetic reply. In some cases I got monetary compensation too.
We need to be aware of our rights and fight against these kinds of malpractices. If all photographers are aware of this issue and are constantly looking for unauthorized use of their images, I am sure it will create an impact on people and these situations will be reduced to a large extent.
Now the most critical question is “How do we know if our images are used anywhere without our permission in the digital media?” The answer is simple… Google Image Search helps us to find our images online. Not always do we need to search for unauthorized images… sometimes, you may even come across some genuine posts with a credit line to you and that is indeed an exciting feeling!
Google uses a histogram & converts it to an algorithm to find the best matches with it. So, we will get the similar images that are available in any website.
How to use Google image search? You can read the Google guide here at goo.gl/vxmq5f or follow me further with these steps by steps instruction on how to use it.
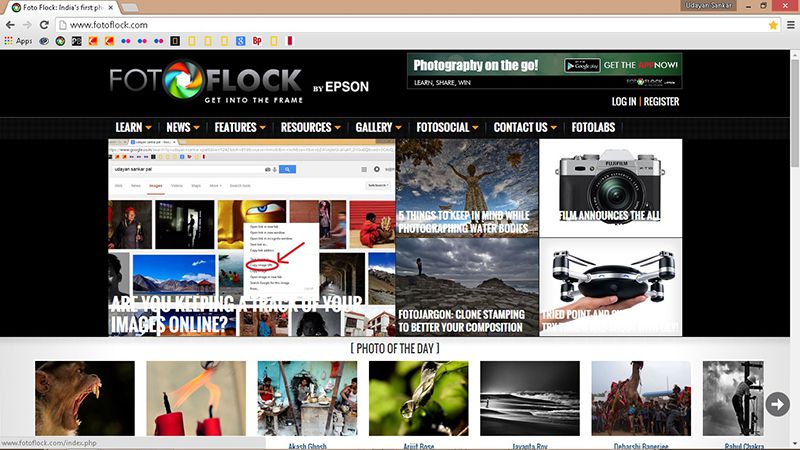
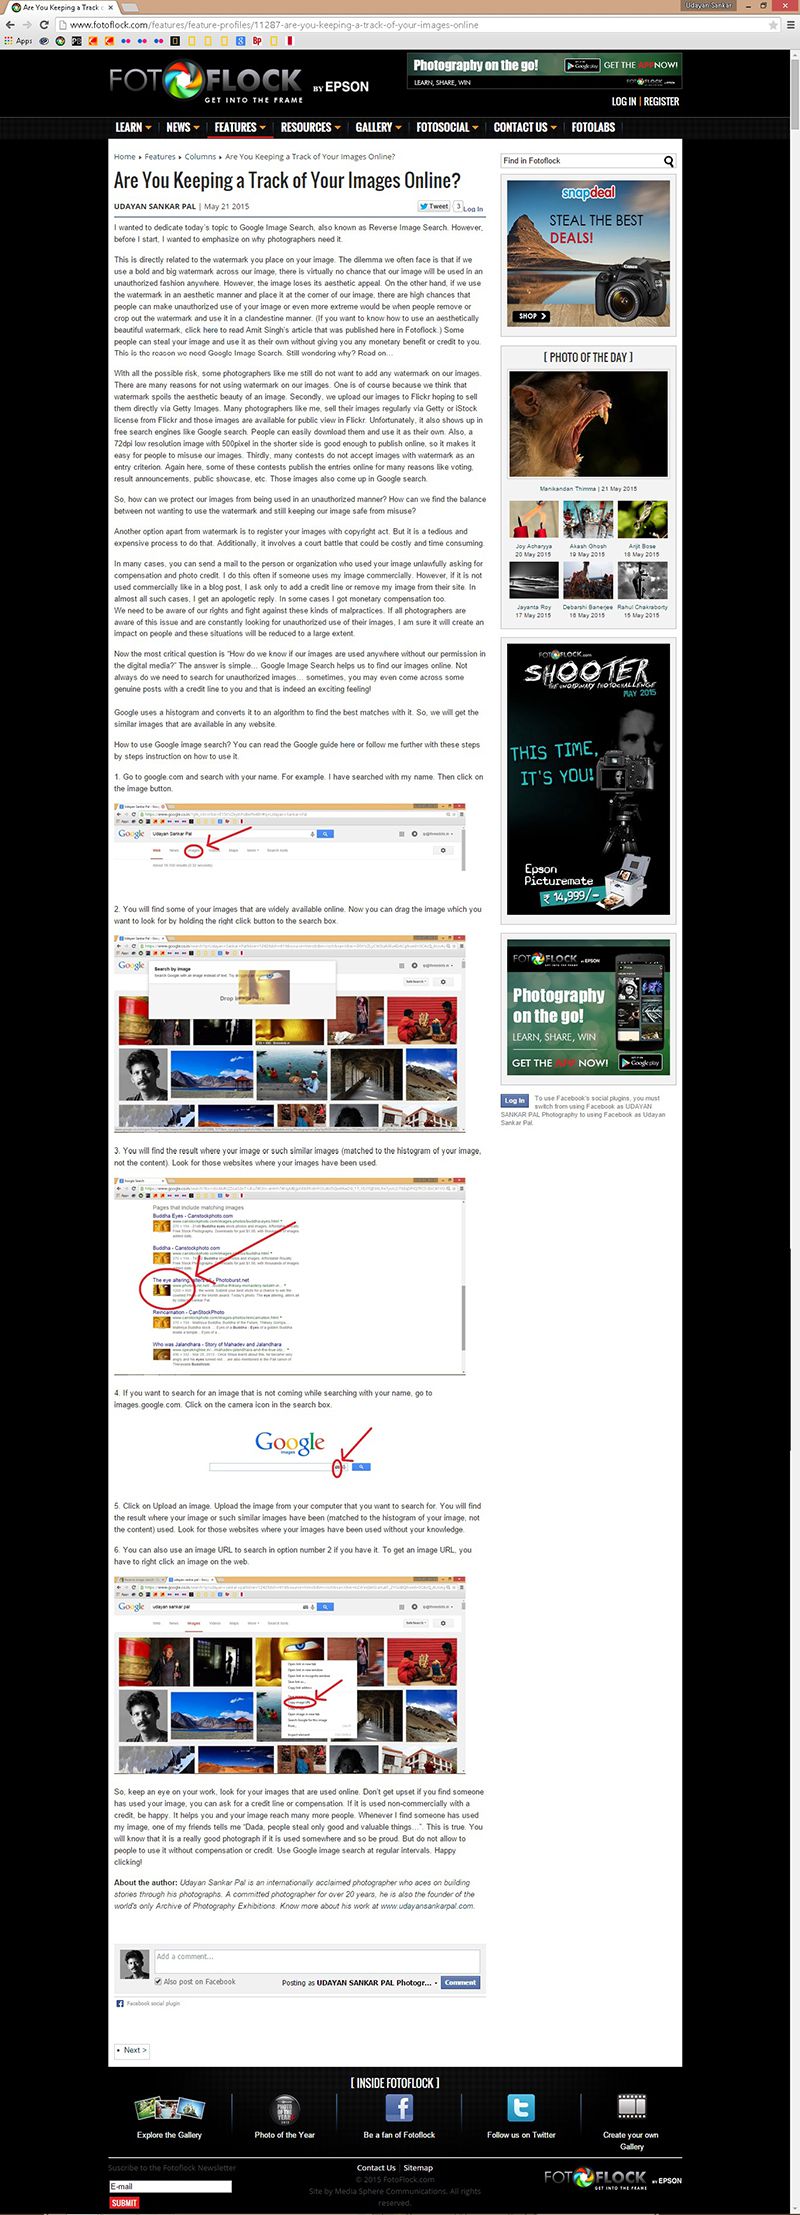
1. Go to google.com & search with your name. For example. I have searched with my name. Then click on the image button.
EXAMPLE: See the iamge here at flic.kr/p/G213Hp
2. You will find some of your images that are widely available online. Now you can drag the image which you want to look for by holding the right click button to the search box.
EXAMPLE: See the iamge here at flic.kr/p/FATEgG
3. You will find the result where your image or such similar images (matched to the histogram of your image, not the content). Look for those websites where your images have been used.
EXAMPLE: See the iamge here at flic.kr/p/FATE7J
4. If you want to search for an image that is not coming while searching with your name, go to images.google.com. Click on the camera icon in the search box.
EXAMPLE: See the iamge here at flic.kr/p/F6K4wV
5. Click on Upload an image. Upload the image from your computer that you want to search for. You will find the result where your image or such similar images have been (matched to the histogram of your image, not the content) used. Look for those websites where your images have been used without your knowledge.
6. You can also use an image URL to search in option number 2 if you have it. To get an image URL, you have to right click an image on the web.
EXAMPLE: See the iamge here at flic.kr/p/F6ykbo
So, keep an eye on your work, look for your images that are used online. Don’t get upset if you find someone has used your image, you can ask for a credit line or compensation. If it is used non-commercially with a credit, be happy. It helps you and your image reach many more people. Whenever I find someone has used my image, one of my friends tells me “Dada, people steal only good & valuable things…”. This is true. You will know that it is a really good photograph if it is used somewhere & so be proud. But do not allow to people to use it without compensation or credit. Use Google image search at regular intervals. |
|
|
|
|
|
|
|
|
1070 |
|
|
|
|
| |
|
| |
|
Famous Photography Quotes Decoded - Part I
|
|
|
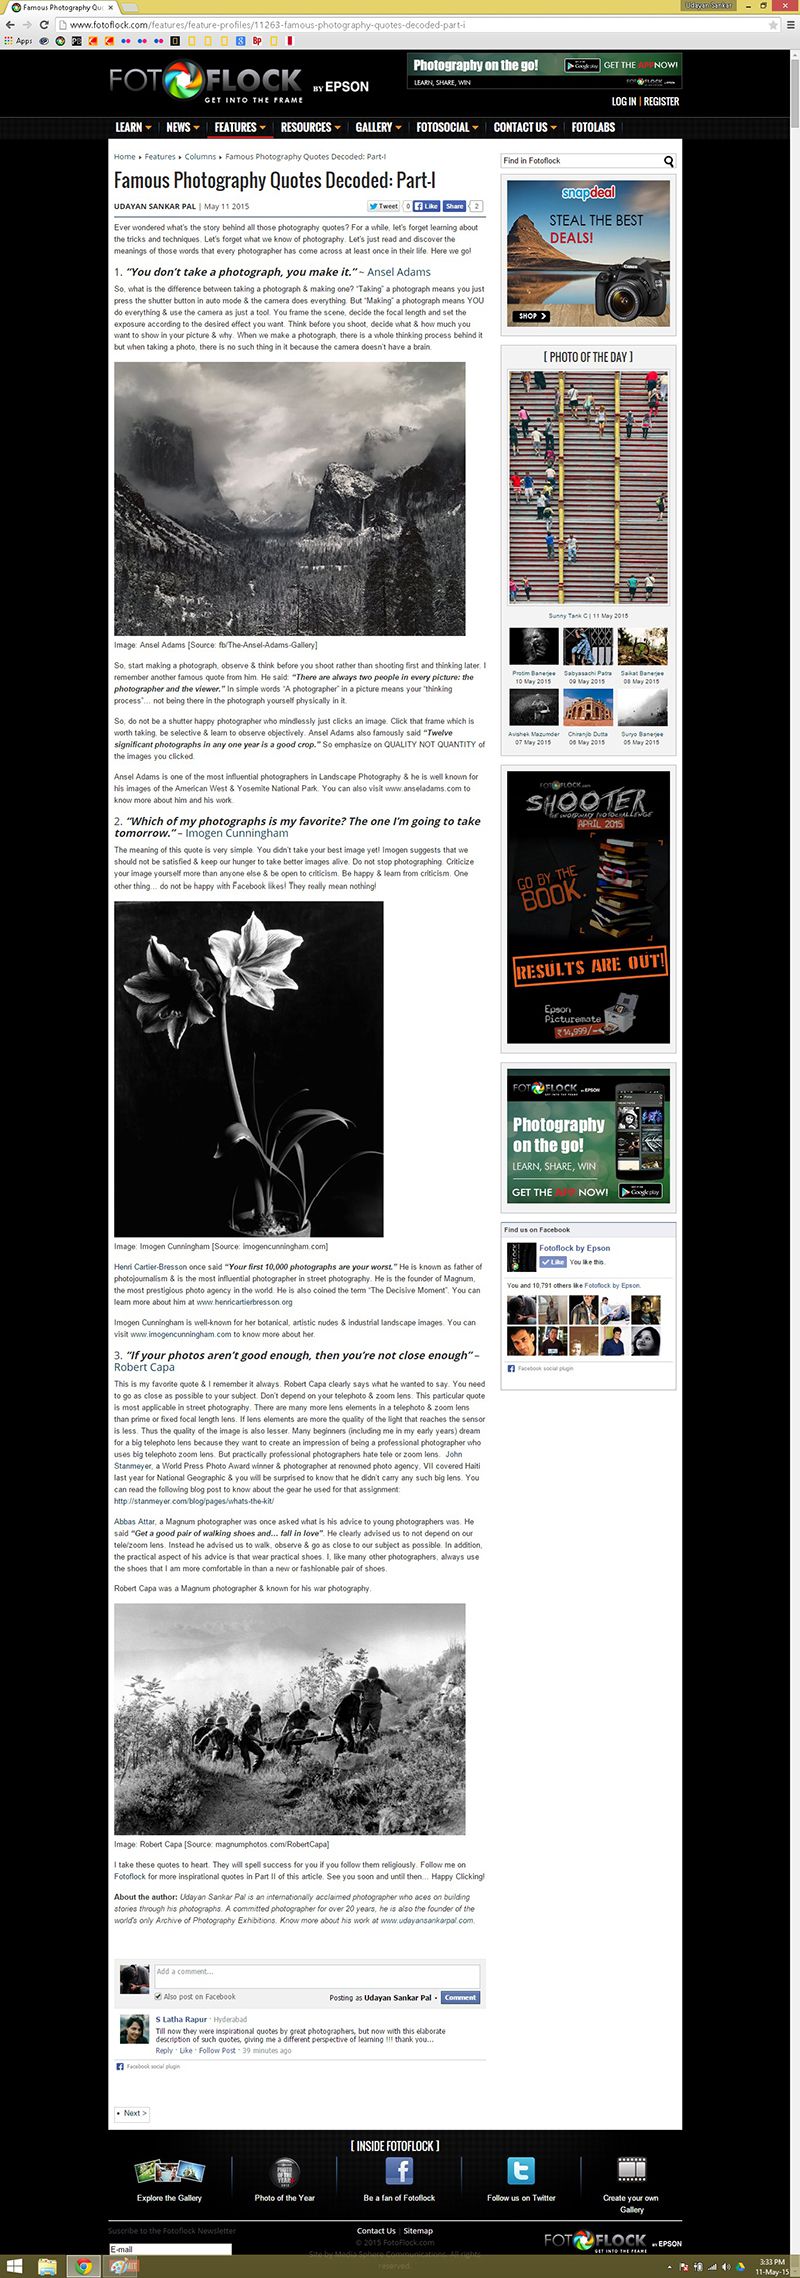
01. YOU DON’T TAKE A PHOTOGRAPH, YOU MAKE IT. -Ansel Adams
So, what is the difference between TAKING a photograph & MAKING one? TAKING a photograph means you just press the shutter button in auto mode & the camera does everything. But MAKING a photograph means YOU do everything & use the camera as just a tool. You frame the scene, decide the focal length and set the exposure according to the desired effect you want. Think before you shoot, decide what & how much you want to show in your picture & why. When we make a photograph, there is a whole thinking process behind it but when taking a photo, there is no such thing in it because the camera doesn’t have a brain.
So, start making a photograph, observe & think before you shoot rather than shooting first and thinking later. I remember another famous quote from him. He said, THERE ARE ALWAYS TWO PEOPLE IN EVERY PICTURE: THE PHOTOGRAPHER AND THE VIEWER. In simple words “A photographer” in a picture means your “thinking process”… not being there in the photograph yourself physically in it.
So, do not be a shutter happy photographer who mindlessly just clicks an image. Click that frame which is worth taking, be selective & learn to observe objectively. Ansel Adams also famously said, TWELVE SIGNIFICANT PHOTOGRAPHS IN ANY ONE YEAR IS A GOOD CROP. So emphasize on QUALITY & NOT QUANTITY of the images you clicked.
Ansel Adams is one of the most influential photographers in Landscape Photography & he is well known for his images of the American West & Yosemite National Park. You can also visit anseladams.com to know more about him and his work.
02. WHICH OF MY PHOTOGRAPHS IS MY FAVORITE? THE ONE I’M GOING TO TAKE TOMORROW. -Imogen Cunningham
The meaning of this quote is very simple. You didn’t take your best image yet! Imogen suggests that we should not be satisfied & keep our hunger to take better images alive. Do not stop photographing. Criticize your image yourself more than anyone else & be open to criticism. Be happy & learn from criticism. One other thing… do not be happy with Facebook likes... they really mean nothing!
Henri Cartier-Bresson once said, YOUR FIRST 10,000 PHOTOGRAPHS ARE YOUR WORST. He is known as father of photojournalism & is the most influential photographer in street photography. He is the founder of Magnum, the most prestigious photo agency in the world. He is also coined the term “The Decisive Moment”. You can learn more about him at henricartierbresson.org
Imogen Cunningham is well-known for her botanical, artistic nudes & industrial landscape images. You can visit imogencunningham.com to know more about her.
03. IF YOUR PHOTOS AREN’T GOOD ENOUGH, THEN YOU’RE NOT CLOSE ENOUGH. -Robert Capa
This is my favorite quote & I remember it always. Robert Capa clearly says what he wanted to say. You need to go as close as possible to your subject. Don’t depend on your telephoto & zoom lens. This particular quote is most applicable in street photography. There are many more lens elements in a telephoto & zoom lens than prime or fixed focal length lens. If lens elements are more the quality of the light that reaches the sensor is less. Thus the quality of the image is also lesser. Many beginners (including me in my early years) dream for a big telephoto lens because they want to create an impression of being a professional photographer who uses big telephoto zoom lens. But practically professional photographers hate tele or zoom lens. John Stanmeyer, a World Press Photo Award winner & photographer at renowned photo agency, VII covered Haiti for National Geographic & you will be surprised to know that he didn’t carry any such big lens. You can read the following blog post to know about the gear he used for that assignment: stanmeyer.com/blog/pages/whats-the-kit/
Abbas Attar, a Magnum photographer was once asked what is his advice to young photographers was. He said, GET A GOOD PAIR OF WALKING SHOES AND… FALL IN LOVE. He clearly advised us to not depend on our tele/zoom lens. Instead he advised us to walk, observe & go as close to our subject as possible. In addition, the practical aspect of his advice is that wear practical shoes. I, like many other photographers, always use the shoes that I am more comfortable in than a new or fashionable pair of shoes.
Robert Capa was a Magnum photographer & known for his war photography.
I take these quotes to heart. They will spell success for you if you follow them religiously. |
|
|
|
|
|
|
|
|
|
1068 |
|
|
|
|
| |
|
| |
|
Fotojargon - Aspect Ratio
|
|
|
Let’s talk about aspect ratio today.
WHAT IS ASPECT RATIO?
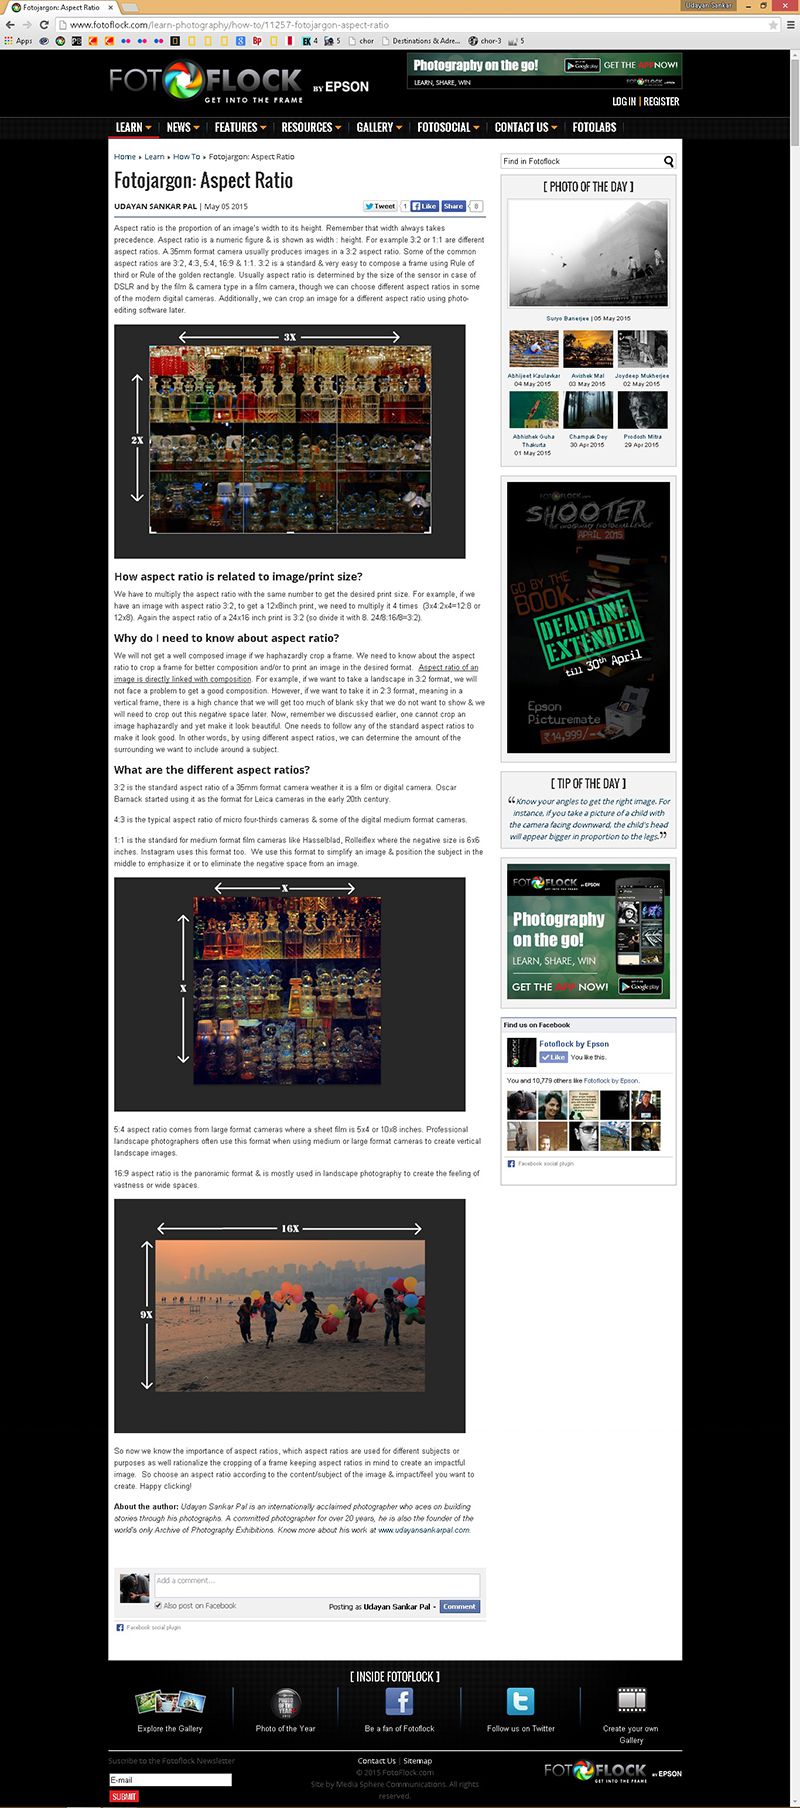
Aspect ratio is the proportion of an image’s width to its height. Remember that width always takes precedence. Aspect ratio is a numeric figure & is shown as width : height. For example 3:2 or 1:1 are different aspect ratios. A 35mm format camera usually produces images in a 3:2 aspect ratio. Some of the common aspect ratios are 3:2, 4:3, 5:4, 16:9 & 1:1. 3:2 is a standard & very easy to compose a frame using Rule of third or Rule of the golden rectangle. Usually aspect ratio is determined by the size of the sensor in case of DSLR and by the film & camera type in a film camera, though we can choose different aspect ratios in some of the modern digital cameras. Additionally, we can crop an image for a different aspect ratio using photo-editing software later.
EXAMPLE: See the image here at https://flic.kr/p/FYAh29
HOW ASPECT RATIO IS RELATED TO IMAGE/PRINT SIZE?
We have to multiply the aspect ratio with the same number to get the desired print size. For example, if we have an image with aspect ratio 3:2, to get a 12x8inch print, we need to multiply it 4 times (3x4:2x4=12:8 or 12x8). Again the aspect ratio of a 24x16 inch print is 3:2 (so divide it with 8. 24/8:16/8=3:2).
WHY DO I NEED TO KNOW ABOUT ASPECT RATIO?
We will not get a well composed image if we haphazardly crop a frame. We need to know about the aspect ratio to crop a frame for better composition and/or to print an image in the desired format. ASPECT RATIO OF AN IMAGE IS DIRECTLY LINKED WITH COMPOSITION. For example, if we want to take a landscape in 3:2 format, we will not face a problem to get a good composition. However, if we want to take it in 2:3 format, meaning in a vertical frame, there is a high chance that we will get too much of blank sky that we do not want to show & we will need to crop out this negative space later. Now, remember we discussed earlier, one cannot crop an image haphazardly and yet make it look beautiful. One needs to follow any of the standard aspect ratios to make it look good. In other words, by using different aspect ratios, we can determine the amount of the surrounding we want to include around a subject.
WHAT ARE THE DIFFERENT ASPECT RATIOS?
3:2 is the standard aspect ratio of a 35mm format camera weather it is a film or digital camera. Oscar Barnack started using it as the format for Leica cameras in the early 20th century.
4:3 is the typical aspect ratio of micro four-thirds cameras & some of the digital medium format cameras.
1:1 is the standard for medium format film cameras like Hasselblad, Rolleiflex where the negative size is 6x6 inches. Instagram uses this format too. We use this format to simplify an image & position the subject in the middle to emphasize it or to eliminate the negative space from an image.
EXAMPLE: See the image here at flic.kr/p/F6rtJE
5:4 aspect ratio comes from large format cameras where a sheet film is 5x4 or 10x8 inches. Professional landscape photographers often use this format when using medium or large format cameras to create vertical landscape images.
16:9 aspect ratio is the panoramic format & is mostly used in landscape photography to create the feeling of vastness or wide spaces.
EXAMPLE: See the image here at flic.kr/p/F6Cb1R
So now we know the importance of aspect ratios, which aspect ratios are used for different subjects or purposes as well rationalize the cropping of a frame keeping aspect ratios in mind to create an impactful image. So choose an aspect ratio according to the content/subject of the image & impact/feel you want to create. |
|
|
|
|
|
|
|
|
1066 |
|
|
|
|
| |
|
| |
|
Fotojargon - Picture Control
|
|
|
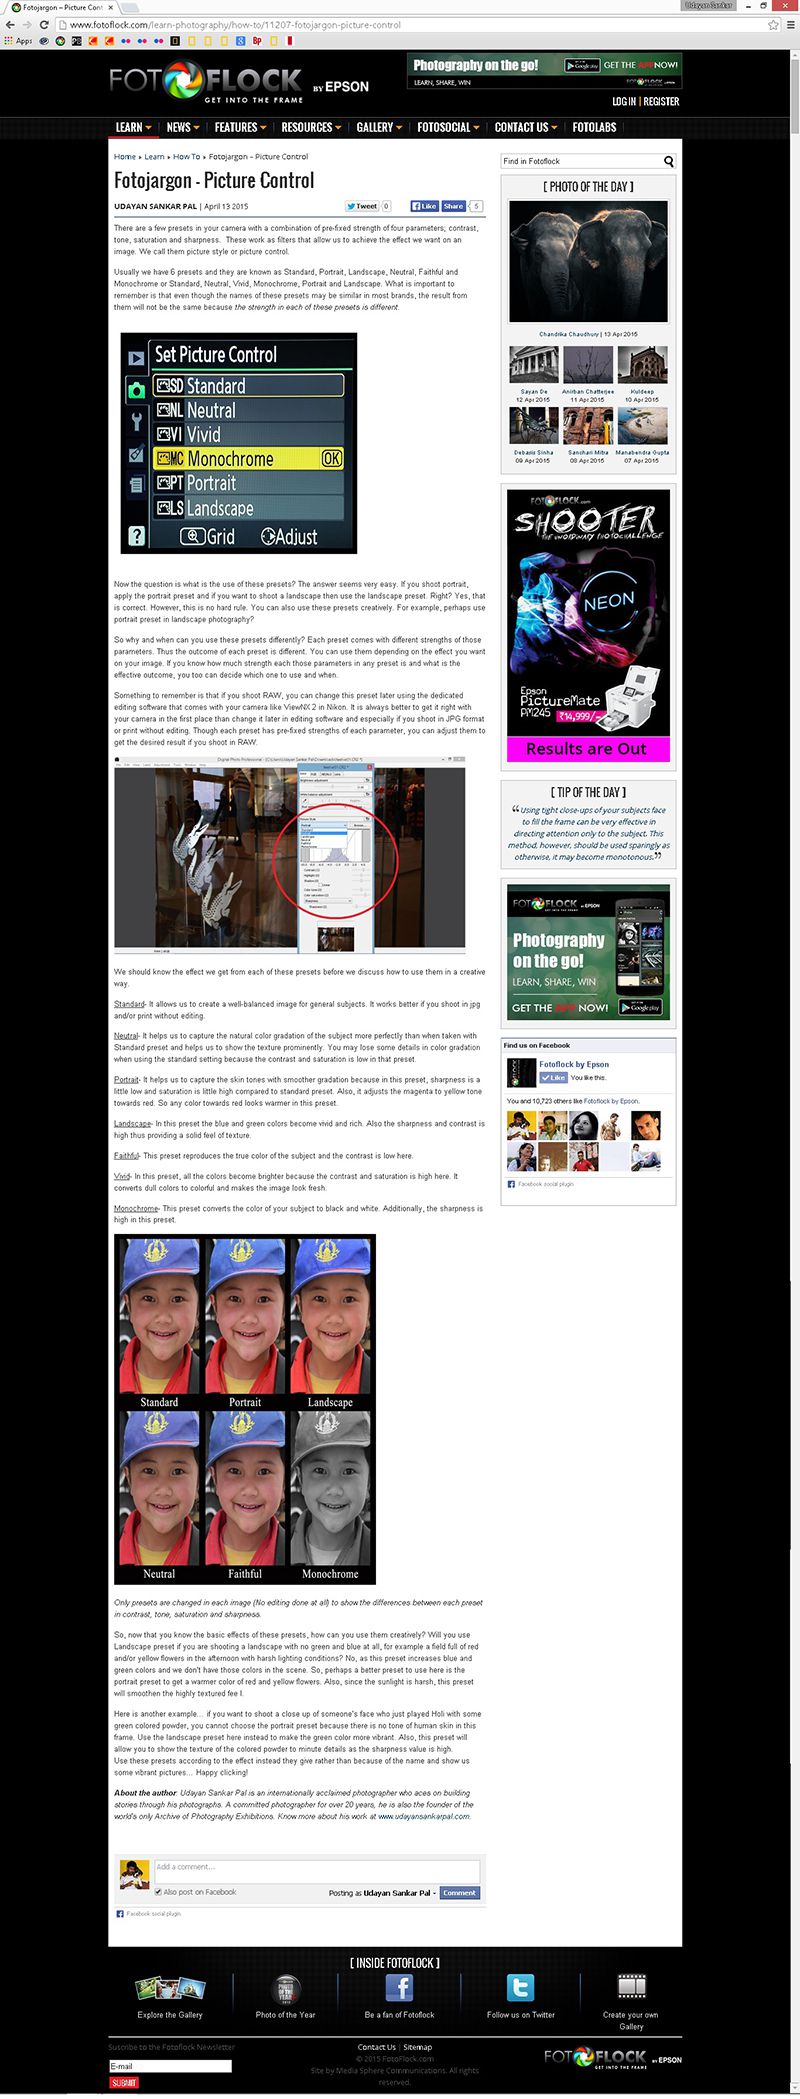
In Canon, it is called Picture Style & in Nikon, it is known as Picture Control. These are a few presets in your camera with a combination of pre-fixed strength of four parameters; contrast, tone, saturation & sharpness. These work as filters that allow us to achieve the effect we want on an image.
There are 6 presets in both Canon and Nikon. While in Canon, they are called Standard, Portrait, Landscape, Neutral, Faithful & Monochrome, in Nikon, they are called Standard, Neutral, Vivid, Monochrome, Portrait & Landscape. What is important to remember is that even though the names of these presets may be similar in most brands, the result from them will not be the same because THE STRENGTH IN EACH OF THESE PRESETS ARE DIFFERENT.
EXAMPLE: See the image here at flic.kr/p/FV1CQV
Now the question is, what is the use of these presets? The answer seems very easy. If you shoot portrait, apply the portrait preset & if you want to shoot a landscape then use the landscape preset. Right? Yes, that is correct. However, this is no hard rule. You can also use these presets creatively. For example, perhaps use portrait preset in landscape photography?
So why & when can you use these presets differently? The answer lies in the 2nd line of this article. Each preset comes with different strengths of those parameters. Thus the outcome of each preset is different. You can use them depending on the effect you want on your image. If you know how much strength each those parameters in any preset is & what is the effective outcome, you too can decide which one to use & when.
Something to remember is that if you shoot RAW, you can change this preset later using the dedicated editing software that comes with your camera like DPP in Canon & ViewNX 2 in Nikon. It is always better to get it right with your camera in the first place than change it later in editing software & especially if you shoot in JPG format or print without editing. Though each preset has pre-fixed strengths of each parameter, you can adjust them to get the desired result if you shoot in RAW.
EXAMPLE: See the image here at flic.kr/p/FAKGRh
Go to Tool Palette to change or adjust Picture Style in Canon DPP (Digital Photo Professional)
We should know the effect we get from each of these presets before we discuss how to use them in a creative way.
STANDARD- It allows us to create a well-balanced image for general subjects. It works better if you shoot in jpg and/or print without editing.
NEUTRAL- It helps us to capture the natural color gradation of the subject more perfectly than when taken with Standard preset & helps us to show the texture prominently. You may lose some details in color gradation when using the standard setting because the contrast & saturation is low in that preset.
PORTRAIT- It helps us to capture the skin tones with smoother gradation because in this preset, sharpness is a little low & saturation is little high compared to standard preset. Also, it adjusts the magenta to yellow tone towards red. So any color towards red looks warmer in this preset.
LANDSCAPE- In this preset the blue & green colors become vivid & rich. Also the sharpness & contrast is high thus providing a solid feel of texture.
FAITHFUL- This preset reproduces the true color of the subject & the contrast is low here.
VIVID- In this preset, all the colors become brighter because the contrast & saturation is high here. It converts dull colors to colorful & makes the image look fresh.
MONOCHROME- This preset converts the color of your subject to black & white. Additionally, the sharpness is high in this preset.
EXAMPLE: See the image here at flic.kr/p/F6B8zv
Only picture style changed in each images (No editing done at all) to show the differences between each preset in contrast, tone, saturation & sharpness.
So, now that you know the basic effects of these presets, how can you use them creatively? Will you use Landscape preset if you are shooting a landscape with no green & blue at all, for example a field full of red and/or yellow flowers in the afternoon with harsh lighting conditions? No, as this preset increases blue & green colors and we don’t have those colors in the scene. So, perhaps a better preset to use here is the portrait preset to get a warmer color of red & yellow flowers. Also, since the sunlight is harsh, this preset will smoothen the highly textured fee l.
Here is another example… if you want to shoot a close up of someone’s face who just played Holi with some green colored powder, you cannot choose the portrait preset because there is no tone of human skin in this frame. Use the landscape preset here instead to make the green color more vibrant. Also, this preset will allow you to show the texture of the colored powder to minute details as the sharpness value is high.
Use these presets according to the effect instead they give rather than because of the name & show us some vibrant pictures… |
|
|
|
|
|
|
|
|
1064 |
|
|
|
|
| |
|
| |
|
5 Image Sharpening Tips Every Pro Swears By
|
|
|
A very common request I get from beginners is to check if their camera or lens is working in perfect condition as they find their images are usually blurry.
There are many criteria to judge if an image is a good one and “sharpness” is considered as one of the most important criterion. It is very disappointing when you take a picture at a special moment and the image come out as soft/blurry or out of focus. In some cases, it’s the camera that can make a difference while in others it’s the photographer and their decisions.
In this article, I will take you through the techniques that I use to make sure that my images always come out sharp.
* The camera setting
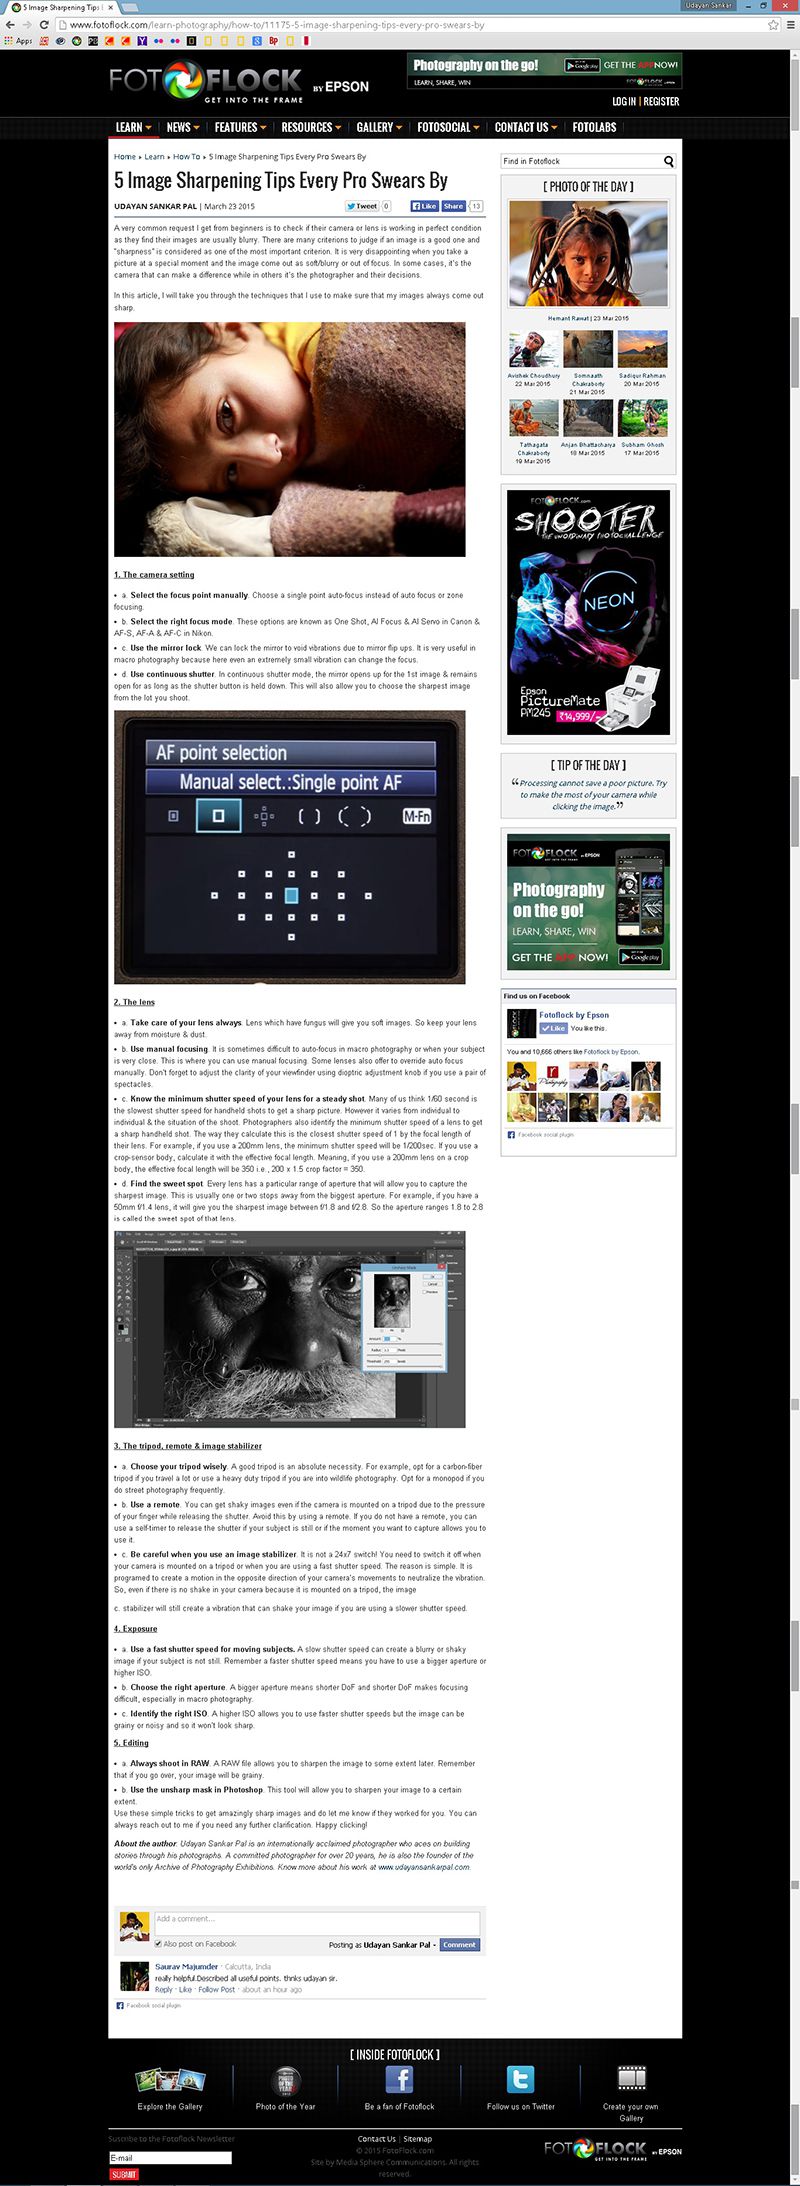
SELECT THE FOCUS POINT MANUALLY. Choose a single point auto-focus instead of auto focus or zone focusing.
SELECT THE RIGHT FOCUS MODE. These options are known as One Shot, AI Focus & AI Servo in Canon & AF-S, AF-A & AF-C in Nikon.
USE THE MIRROR LOCK. We can lock the mirror to void vibrations due to mirror flip ups. It is very useful in macro photography because here even an extremely small vibration can change the focus.
USE CONTINUOUS SHUTTER. In continuous shutter mode, the mirror opens up for the 1st image & remains open for as long as the shutter button is held down. This will also allow you to choose the sharpest image from the lot you shoot.
EXAMPLE: Check this image to understand here at flic.kr/p/FUvsfz
* The lens
TAKE CARE OF YOUR LENS ALWAYS. Lens which have fungus will give you soft images. So keep your lens away from moisture & dust.
USE MANUAL FOCUSING. It is sometimes difficult to auto-focus in macro photography or when your subject is very close. This is where you can use manual focusing. Some lenses also offer to override auto focus manually. Don’t forget to adjust the clarity of your viewfinder using dioptric adjustment knob if you use a pair of spectacles.
KNOW THE MINIMUM SHUTTER SPEED OF YOUR LENS FOR A STEADY SHOT. Many of us think 1/60 second is the slowest shutter speed for handheld shots to get a sharp picture. However it varies from individual to individual & the situation of the shoot. Photographers also identify the minimum shutter speed of a lens to get a sharp handheld shot. The way they calculate this is the closest shutter speed of 1 by the focal length of their lens. For example, if you use a 200mm lens, the minimum shutter speed will be 1/200sec. If you use a crop-sensor body, calculate it with the effective focal length. Meaning, if you use a 200mm lens on a crop body, the effective focal length will be 350 i.e., 200 x 1.5 crop factor = 350.
FIND THE SWEET SPOT. Every lens has a particular range of aperture that will allow you to capture the sharpest image. This is usually one or two stops away from the biggest aperture. For example, if you have a 50mm f/1.4 lens, it will give you the sharpest image between f/1.8 and f/2.8. So the aperture ranges 1.8 to 2.8 is called the sweet spot of that lens.
* The tripod, remote & image stabilizer
CHOOSE YOUR TRIPOD WISELY. A good tripod is an absolute necessity. For example, opt for a carbon-fiber tripod if you travel a lot or use a heavy duty tripod if you are into wildlife photography. Opt for a monopod if you do street photography frequently.
USE A REMOTE. You can get shaky images even if the camera is mounted on a tripod due to the pressure of your finger while releasing the shutter. Avoid this by using a remote. If you do not have a remote, you can use a self-timer to release the shutter if your subject is still or if the moment you want to capture allows you to use it.
BE CAREFUL WHEN YOU USE AN IMAGE STABILIZER. It is not a 24x7 switch! You need to switch it off when your camera is mounted on a tripod or when you are using a fast shutter speed. The reason is simple. It is programed to create a motion in the opposite direction of your camera’s movements to neutralize the vibration. So, even if there is no shake in your camera because it is mounted on a tripod, the image stabilizer will still create a vibration that can shake your image if you are using a slower shutter speed.
* Exposure
USE A FAST SHUTTER SPEED FOR MOVING SUBJECTS. A slow shutter speed can create a blurry or shaky image if your subject is not still. Remember a faster shutter speed means you have to use a bigger aperture or higher ISO.
CHOOSE THE RIGHT APERTURE. A bigger aperture means shorter DoF and shorter DoF makes focusing difficult, especially in macro photography.
IDENTIFY THE RIGHT ISO. A higher ISO allows you to use faster shutter speeds but the image can be grainy or noisy and so it won’t look sharp.
* Editing
ALWAYS SHOOT IN RAW. A RAW file allows you to sharpen the image to some extent later. Remember that if you go over, your image will be grainy.
USE THE UNSHARP MASK IN PHOTOSHOP. This tool will allow you to sharpen your image to a certain extent.
EXAMPLE: Check the image here at flic.kr/p/FScfUh
Use these simple tricks to get amazingly sharp images and do let me know if they worked for you. You can always reach out to me if you need any further clarification. |
|
|
|
|
|
|
|
|
|
1062 |
|
|
|
|
| |
|
| |
|
Your Ultimate Handbook to Exposure in Photography
|
|
|
Exposure is the amount of light that you allow to hit the sensor of your camera. We know that there are three elements that control exposure, shutter speed, aperture & ISO. Any exposure is a combination of these three critical elements in different strengths resulting in different effects. So deciding which exposure to give is dependent on the effect you want to achieve. In this article we will try to understand the relation between these three elements & the effect they can produce with any given combination.
1. SHUTTER SPEED: This helps us control the length of time that we want the light to hit the sensor for. Here is why we need various shutter speeds;
a) THE MOTION OF VARIOUS SUBJECTS DIFFER- So, if you want to get a sharp image of a subject running at a high speed (moving train), you need a fast shutter speed & if the subject is running at a slow speed or is still, you can use a slower shutter speed. An exception would be when you want to show motion or action in your subject. Use a slow shutter speed then.
b) TO ACCOMMODATE A LOW LIGHT CONDITION- If the available light is very low, use a longer shutter speed to get more light on the sensor.
2. APERTURE: An aperture is the size of the opening of the lens through which light travels. You can control the size of this opening to get two types of results;
a) TO GET DIFFERENT DEPTH OF FIELD (DOF)- DoF indicates how much of the picture is in focus. A bigger aperture (like F/1.2 or F/2.8) gives shorter DoF and a smaller aperture (like F/11 or F/16) gives a larger DoF.
b) TO GET THE DETAILS IN AN IMAGE- A bigger aperture means more details & smaller one means less details.
Example: Check out this image to understand it better here at flic.kr/p/FRZKfE
3. ISO: ISO is the sensitivity of the sensor to light. Usually, 100-400 ISO is best for daylight & 400-1200 ISO is good for indoor light & anything above 1600 ISO is used in low light conditions. However, the trouble with increasing the ISO is that the picture gets noisy & grainy along with reducing the operational speed of the camera.
Now that the introduction to the three elements of exposure & how they impact our image is over, let’s move on to another important aspect. How to set them right to get the desired image? Deciding the strength of each of these elements depends on the available light. Since they are inter related, changing the value of any one element will require you to adjust another or in some cases both of remaining elements. The question is how much do you need to change them? Let me do a quick activity to elaborate.
EXAMPLE: Look at the image here at flic.kr/p/FA48fQ
I am filling a glass of water. Consider the following aids to the activity. The glass can contain 400ml of water, the mouth of the tap is 2cm wide and it takes 8 seconds to fill the glass when the water is flowing with full speed. Now, try to answer the following questions.
Q1: How much time will it take to fill a glass that can contain 800ml water from this tap?
A: It will take double the time (16 seconds) because the volume of water this glass can hold is double the one given in the example. Similarly, if the glass could hold only 200ml water, it would have taken half the time (4 seconds).
Q2: How much time will it take to fill the glass that can contain 400ml of water if the mouth of the tap doubles (4cm) in size?
A: It will take half the time (4 seconds) because the flow of water would double. Similarly, it will take 16 seconds if we shrink the mouth of the tap to 1cm.
Q3: How much time would you need to fill a glass that can contain 1200ml water if nothing else changed?
A: It will take 3 times more time because the size of the glass is 3 times larger.
The moral of the activity is that if you thoughtlessly change any element, i.e., the mouth of the tap, the volume of the glass or the length of time the tap is open, you will either get a half filled glass or waste some water. If we want an exact glass of water & should any of these elements change, we need to adjust the others to get best results.
Now let’s liken the opening of the tap to aperture, the size of the glass to ISO & the time that tap is open to shutter speed. The relationship between these three elements replicates the relation between the three activity aids. If you change any of these elements randomly, you will get an over exposed image (like wasted water) or an under exposed image (like a glass not full).
Keep this simple formula for success in mind. |
|
|
|
|
|
|
|
|
1060 |
|
|
|
|
| |
|
| |
|
Preserving Photography History with Postage Stam
|
|
|
The study and collection of postage stamps is called philately & collectors are known as philatelists. Philately is a highly valued hobby as well as in some cases profession. However, a random collection of stamps with no particular theme usually is not highly valued. So, philatelists like to collect them according to themes of their choice, a particular subject or from a particular country.
As this is a forum dedicated to the art of photography and to photographers, I want to talk to you about those stamps that are centered on our love, photography. The stamps shared below do not focus on the photographs that were used in the stamps. Although there is a huge number of stamps where iconic images are used, I want to focus on those that are related to photography in a broader sense today. All the stamps shown below are from my personal collection and will allow you to gain insight on some aspects of the strong history of photography from around the World.
Stamp 1: flic.kr/p/F5GXHm
This commemorative stamp was released by India Post in 2006 to honor Lala Deen Dayal (1844-1905). What’s interesting is that he is the only photographer featured in an Indian stamp. His career began in the mid-1870s as a commissioned photographer eventually setting up studios in Indore, Mumbai and Hyderabad. He became the court photographer to the sixth Nizam of Hyderabad who awarded him the title Musawwir Jung Raja Bahadur. He was also appointed as the photographer to the Viceroy of India in 1885. He received the Royal Warrant from Queen Victoria in 1897. You can visit deendayal.com or rajadeendayal.com for more information on him and to see some of his work.
Stamp 2: flic.kr/p/FXRGp3
The United States Postal Service (USPS) issued twenty 37-cent Masters of American Photography commemorative stamps on June 13, 2002, in San Diego, California. The Masters of American Photography Issue honors twenty of America’s most important and influential photographers. According to USPS, these twenty stamps as a series offer a visual sampling of the history and development of photography and illustrate the changes in American culture and society. Photographers featured on these stamps are Albert Sands Southworth, Josiah Johnson Hawes, Timothy H. O’Sullivan, Carleton E. Watkins, William Henry Jackson, Gertrude Ksebier, Lewis Wickes Hine, Alvin Langdon Coburn, Edward (Edouard) Steichen, Alfred Stieglitz , Man Ray, Edward Weston, James VanDerZee, Dorthea Lange, Walker Evans, W. Eugene Smith, Paul Strand, Ansel Adams, Imogen Cunningham, Andr Kertsz, Garry Winogrand & Minor White. You can visit goo.gl/xQK9R3 to know more about these stamps.
Stamp 3: flic.kr/p/F5GXL7
1989 was the 150th Anniversary of the invention of photography. Many countries like China, Russia and Mexico published commemorative stamps. My favorite among them is the one that China published just for its beauty.
Stamp 4: flic.kr/p/FUhYZ6
This one is the last one I will share in today’s article. I cannot ignore this stamp because the man on the stamp has contributed immensely to modern photography. He is none other than George Eastman (1854~1932), the Founder of Eastman Kodak. On July 12, 1954 USPS issued a 3-cent commemorative stamp marking the 100th Anniversary of George Eastman’s birth. He is remembered as the inventor of the roll film that helped in bringing photography to the mainstream. Years later, this invention led to the development of motion picture film.
There are lots of other stamps on photography as well. Many people collect vintage cameras, vintage prints, books on photography, etc. So, why not start collecting stamps related to photography? You can look for them on online retailer sites or hobby portals. My collection of stamps have helped me spur my passion as well as made me more informed on the legacy I am carrying forward. Photography is indeed a lot of fun! |
|
|
|
|
|
|
|
|
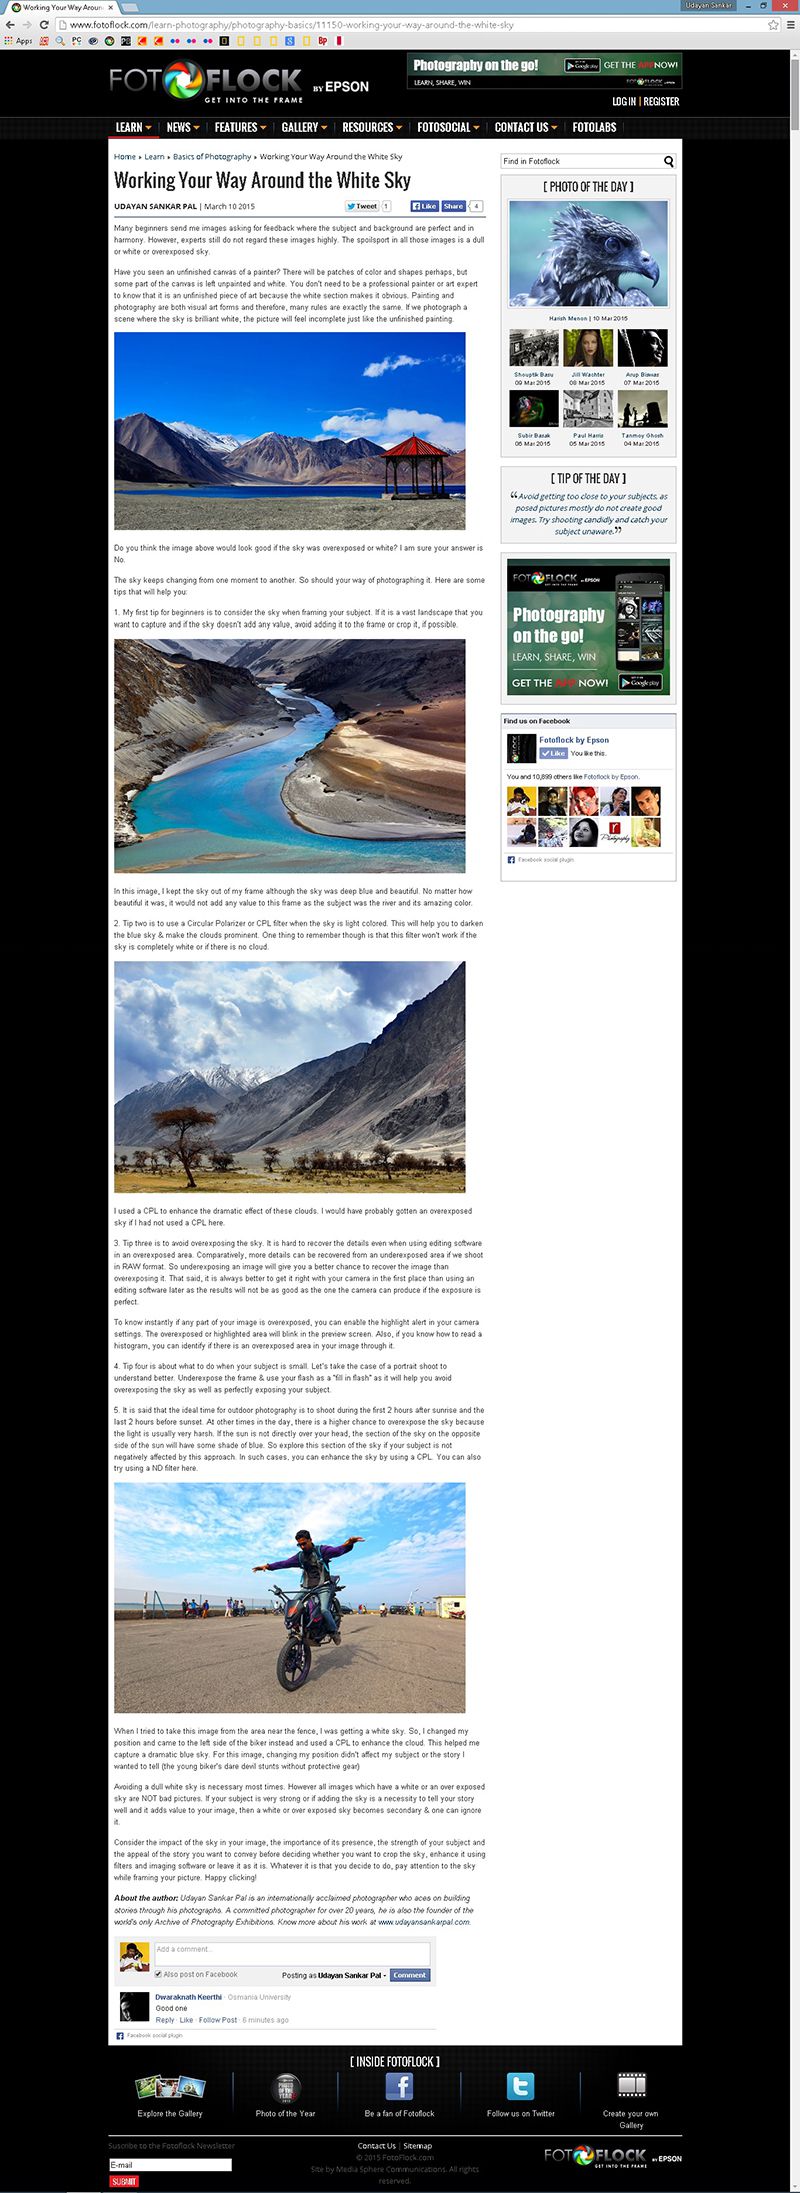
1058 |
|
|
|
|
| |
|
| |
|
Working Your Way Around the White Sky
|
|
|
Many beginners send me images asking for feedback where the subject and background are perfect and in harmony. However, experts still do not regard these images highly. The spoilsport in all those images is a dull or white or overexposed sky.
Have you seen an unfinished canvas of a painter? There will be patches of color and shapes perhaps, but some part of the canvas still is unpainted and white. You don’t need to be a professional painter or art expert to know that it is an unfinished piece of art because the white section makes it obvious. Painting & photography are both visual art forms & therefore many rules are exactly the same. If we photograph a scene where the sky is brilliant white, the picture will feel incomplete just like the unfinished painting.
Example: Check out this image first at flic.kr/p/fiYiTz
Do you think the image would look good if the sky was overexposed or white? I am sure your answer is no.
The sky keeps changing from one moment to another. So should your way of photographing it. Here are some tips that will help you:
TIP 1. My first tip for the beginners is to consider the sky when framing your subject. If it is a vast landscape that you want to capture and if the sky doesn’t add any value, avoid adding it to the frame or crop it, if possible.
Example: Check out this image first at flic.kr/p/fk2YVN
In this image, I kept the sky out of my frame although the sky was deep blue and beautiful. No matter how beautiful it was, it would not add any value to this frame as the subject was the river & its amazing color.
TIP 2. Tip two is to use a Circular Polarizer or CPL filter when the sky is light colored. This will help you to darken the blue sky & make the clouds prominent. One thing to remember though is that this filter won’t work if the sky is completely white or if there is no cloud.
Example: Check out this image first at flic.kr/p/fk2dPQ
I used a CPL to enhance the dramatic effect of these clouds. I would have probably got an overexposed sky if I had not used a CPL here.
TIP 3. Tip three is to avoid overexposing the sky. It is hard to recover the details even when using editing software in an overexposed area. Comparatively, more details can be recovered from an underexposed area if we shoot in RAW format. So underexposing an image will give you a better chance to recover the image than overexposing it. That said, it is always better to get it right with your camera in the first place than using an editing software later as the results will not be as good as the one the camera can produce if the exposure is perfect.
To know instantly if any part of your image is overexposed, you can enable the highlight alert in your camera settings. The overexposed or highlighted area will blink in the preview screen. Also, if you know how to read a histogram, you can identify if there is an overexposed area in your image through it.
TIP 4. Tip four is about what to do when your subject is small. Let’s take the case of a portrait shoot to understand better. Underexpose the frame & use your flash as a “fill in flash” as it will help you avoid overexposing the sky as well as perfectly exposing your subject.
TIP 5. Tip five. It is said that the ideal time for outdoor photography is to shoot during the first 2 hours after sunrise and the last 2 hours before sunset. At other times in the day, there is a higher chance to overexpose the sky because the light is usually very harsh. If the sun is not directly over your head, the section of the sky on the opposite side of the sun will have some shade of blue. So explore this section of the sky if your subject is not negatively affected by this approach. In such cases, you can enhance the sky by using a CPL. You can also try using a ND filter here.
Example: Check out this image first at flic.kr/p/kWu3jG
When I tried to take this image from the area near the fence, I was getting a white sky. So, I changed my position and came to the left side of the biker instead and used a CPL to enhance the cloud. This helped me capture a dramatic blue sky. For this image, changing my position didn’t affect my subject or the story I wanted to tell (the young biker’s dare devil stunts without protective gear)
Avoiding a dull white sky is necessary most times. However all images which have a white or an over exposed sky are NOT bad pictures. If your subject is very strong or if adding the sky is a necessity to tell your story well and it adds value to your image, then a white or over exposed sky becomes secondary & one can ignore it.
Consider the impact of the sky in your image, the importance of its presence, the strength of your subject and the appeal of the story you want to convey before deciding whether you want to crop the sky, enhance it using filters and imaging software or leave it as it is. Whatever it is that you decide to do, pay attention to the sky while framing your picture. |
|
|
|
|
|
|
|
|
|
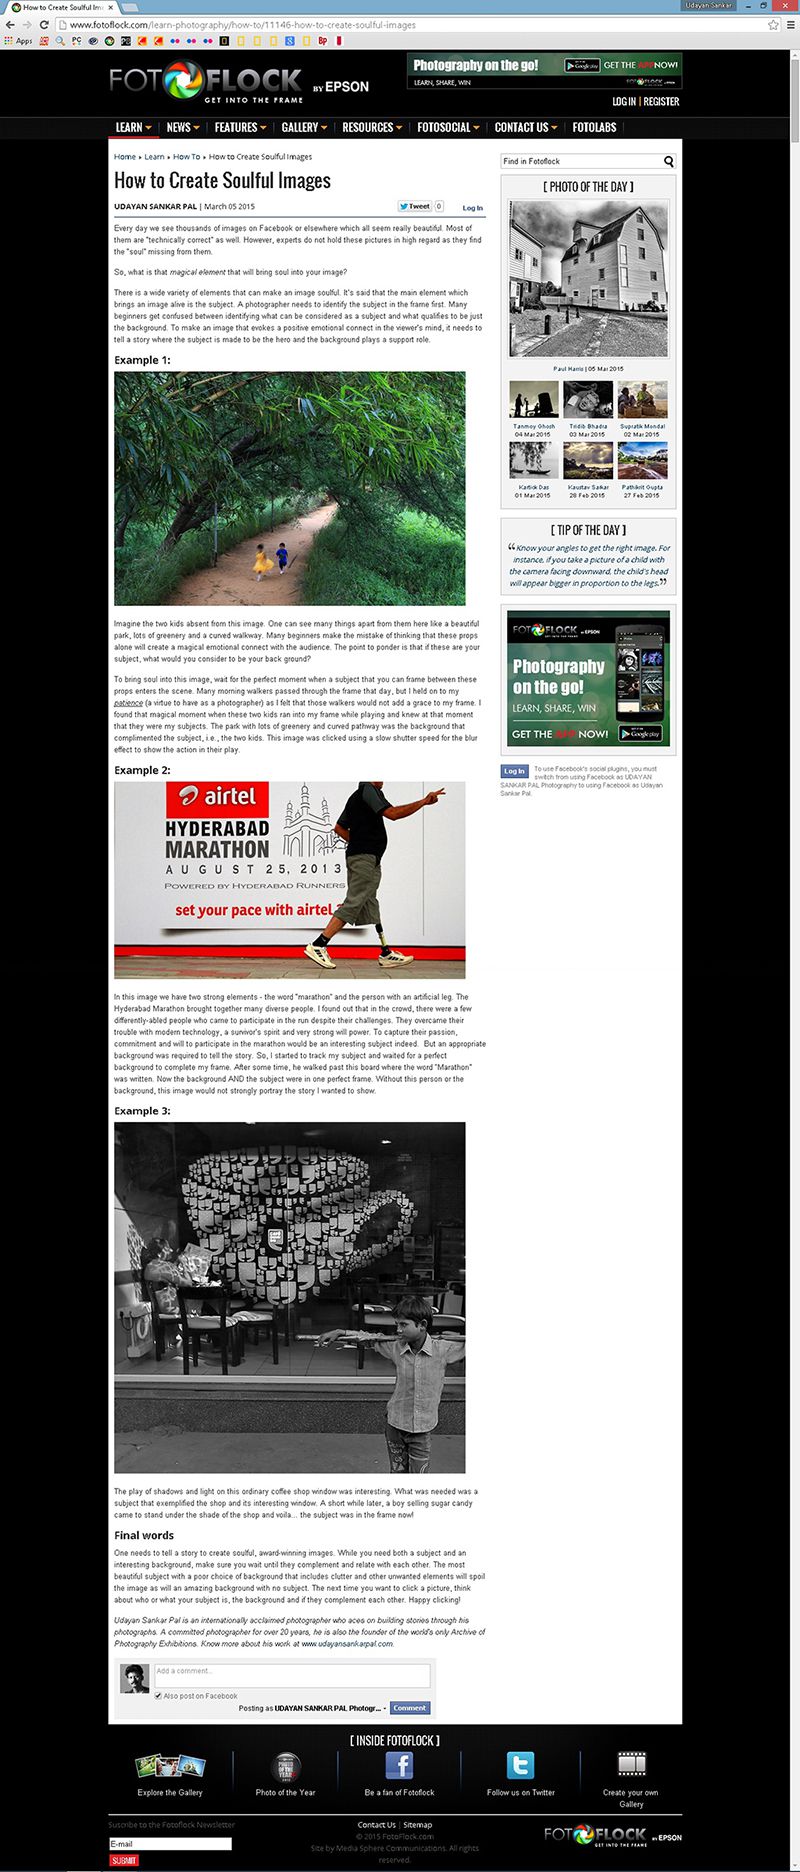
1056 |
|
|
|
|
| |
|
| |
|
How to Create Soulful Images
|
|
|
Every day we see thousands of images on Facebook or elsewhere which all seem really beautiful. Most of them are “technically correct” as well. However, experts do not hold these pictures in high regard as they find the “soul” missing from them.
So, what is that MAGICAL ELEMENT that will bring soul into your image?
There are a wide variety of elements that can make an image soulful. It’s said that the main element which brings an image alive is the SUBJECT. A photographer needs to identify the subject in the frame first. Many beginners get confused between identifying what can be considered as a subject & what qualifies to be just the background. To make an image that evokes a positive emotional connect in the viewer’s mind, it needs to tell a story where the subject is made to be the hero and the background plays a support role.
Example 1: See the image first here at flic.kr/p/oSM3Lx
Imagine the two kids absent from this image. One can see many things apart from them here like a beautiful park, lots of greenery and a curved walkway. Many beginners make the mistake of thinking that these props alone will create a magical emotional connect with the audience. The point to ponder is that if these are your subject, what would you consider to be your back ground?
To bring soul into this image, wait for the perfect moment when a subject that you can frame between these props enters the scene. Many morning-walkers passed through the frame that day, but I held on to my PATIENCE (a virtue to have as a photographer) as I felt that those walkers would not add a grace to my frame. I found that magical moment when these two kids ran into my frame while playing and knew at that moment that they were my subjects. The park with lots of greenery and curved pathway was the back ground that complimented the subject, i.e., the two kids. This image was clicked using a slow shutter speed for the blur effect to show the action in their play.
Example 2: See the image first here at flic.kr/p/g7o8zz
In this image we have two strong elements. The word “marathon” & the person with an artificial leg. The Hyderabad Marathon brought together many diverse people. I found out that in the crowd, there were a few differently-abled people who came to participate in the run despite their challenges. They overcame their trouble with modern technology, a survivor’s spirit & very strong will power. To capture their passion, commitment and will to participate in the marathon would be an interesting subject indeed. But an appropriate background was required to tell the story. So, I started to track my subject & waited for a perfect background to complete my frame. After some time, he walked past this board where the word “Marathon” was written. Now the background AND the subject were in one perfect frame. Without this person or the background, this image would not strongly portray the story I wanted to show.
Example 3: See the image first here at flic.kr/p/qnTnBK
The play of shadows and light on this ordinary coffee shop window was interesting. What was needed was a subject that exemplified the shop and its interesting window. A short while later, a boy selling sugar candy came to stand under the shade of the shop and voila... the subject was in the frame now!
Final words: One needs to tell a story to create soulful, award winning images. While you need both a subject & an interesting background, make sure you wait until they complement & relate with each other. The most beautiful subject with a poor choice of background that includes clutter and other unwanted elements will spoil the image as will an amazing background with no subject. The next time you want to click a picture, think about who or what your subject is, the background & if they complement each other. |
|
|
|
|
|
|
|
|